Build a Modern Scalable System - Runtime Challenges
Published:
by
Zhenghui Lee
![]()
- Categories:
- microservices 7
This article is Part 2 in a 7-Part Series.
- Part 1 - Build a Modern Scalable System - Basics
- Part 2 - This Article
- Part 3 - Build a Modern Scalable System - Practice on Embedded Router Mode w/ Spring-Cloud
- Part 4 - Build a Modern Scalable System - Practice on Gateway Mode For Mixed-Languages Case
- Part 5 - Build a Modern Scalable System - Practice on Service Mesh Mode with Consul and Nomad
- Part 6 - Build a Modern Scalable System - Practice on Service Mesh Mode with Consul, Nomad and Envoy
- Part 7 - Build a Modern Scalable System - Presentation of Runtime and Data Layers Challenges(in Chinese)
Table of Contents
- Table of Contents
- Runtime stack comparison
- Packing in MSA
- Orchestration in MSA
- Communication(calling service) in MSA
- Reference modes for MSA service communication
- DevOps Concerns
- How to decide a orchestrator?
- Wrapping up
- Appendix
In last post, I introduced the architecture challenges for building an application with high scalability, which followed by the explanations on scalability mode, architectures evolution and components/principles of MSA. In this post, let's focus on the MSA runtime part challenges as well as some analysis on three typical architecture reference modes which can help us for a step-by-step achieving cloud-native destination.
Firstly, let's compare the MSA runtime technical stack with tranditional architectures
Runtime stack comparison
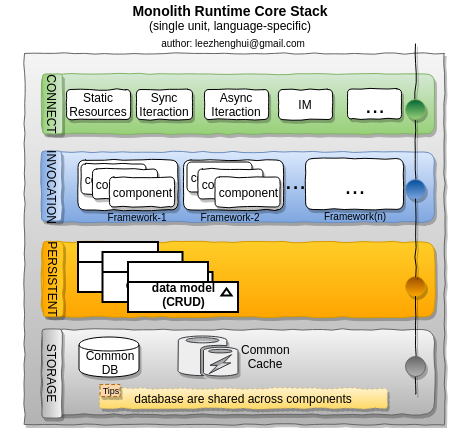
Layered runtime stack for trasnditonal architecture
The tranditional runtime stack commonly is a classic MVC-like style. Various frameworks are used to make the implementation with a good modularization structure, easy for extension and adding new features. The data model is typical CRUD(Create, Retrieve, Update and Delete) style, data models and data store are shared with all components. All of these components run as a single unit.
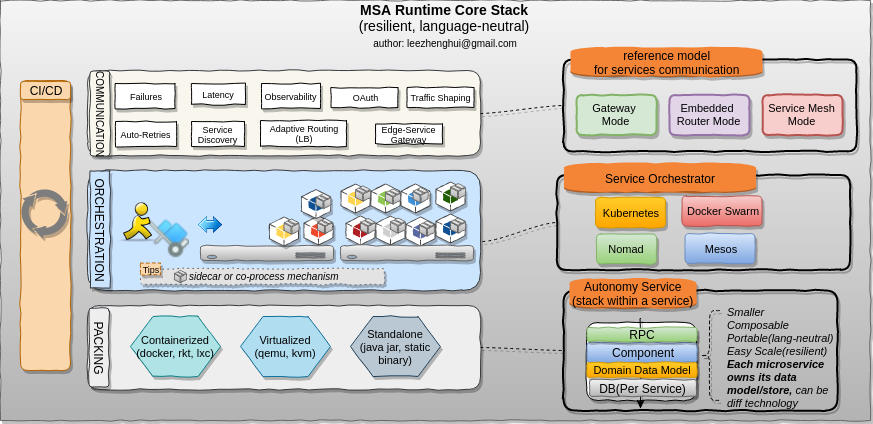
MSA Runtime Stack
MSA runtime is not a MVC-like shape anymore. In order to have a large number of autonomy services work together seamlessly, it need to involve more functionalities from operational perspective, including CI/CD, deployable packing(VM-based, container-based, standalone application or any combination of these artifact type), service orchestration(including various isolation technologies support) and many cross-cutting concerns features for service communictions which typcially be shipped by gateway mode, embedded router mode, or Service-Mesh mode, all of these components compose a more complex MSA runtime stack.
The Microservices architecture apparently can highly reduce application complexity, but as a trade-off, it bring a high operational complexity, including an efficient runtime environment provision, service register, discovery and orchestration, etc.
In short, Building a microservcies != Running a microservices.
Packing in MSA
MSA is a polyglot world. Ideally, application can select any best suited technical stack to accomplish their work, there should no restrict to the programming languages. In such way, we can't simply reply on language-spec packing technology in a cloud-native platform. The Packing layer abstract the details on this field.
As you see in the MSA runtime stack diagram, the bottom layer is called Packing. What is the packer? The input for the packer is the compiled result from your source code, which has been fully tested by the CI pipeline tasks, the output for packer is a deployable object providing portability and ability of running in an isolated execution space on the host.
From opencontainer.org
OCI, The Open Container Initiative (OCI) is a lightweight, open governance structure (project), formed under the auspices of the Linux Foundation, for the express purpose of creating open industry standards around container formats and runtime.The OCI currently contains two specifications: the Runtime Specification (runtime-spec) and the Image Specification (image-spec). The Runtime Specification outlines how to run a “filesystem bundle” that is unpacked on disk. At a high-level an OCI implementation would download an OCI Image then unpack that image into an OCI Runtime filesystem bundle. At this point the OCI Runtime Bundle would be run by an OCI Runtime.

What kind of packing type being used should be considered in conjunction with your orchestrator as well as some of opertional toolkits you are replying on for your server environment problem diagnosis, e.g: the linux CPU profiling tool - perf_event is not container-awared prior to linux 4.14, if want to run perf for a flamegraph, you still need additional efforts to transfer the symbol-mapping file(container-pid based) as well as the relevant binaries dependences between host and inner container to generate the flamegraph with full VM language stack(e.g: Java , Node.js). Please refer to link for more details.
Orchestration in MSA
In monoliths, frameworks make the components work together seamlessly within a process via high modularity way, in Microservices, the service orchestration(scheduler) actually abstract the details(e.g: complex failure modes, logging aggregation, something need run alongside "main" process which need a sidecar or co-process pattern, and etc), focus on service composition, and ensure all the services which running in individual processes/nodes but still behaviors as running in single node and single process space.
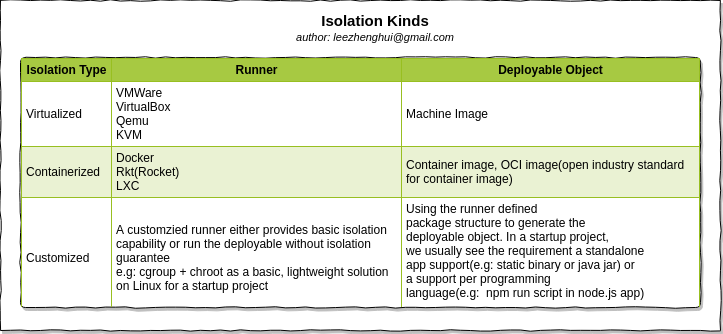
Isolation Technologies
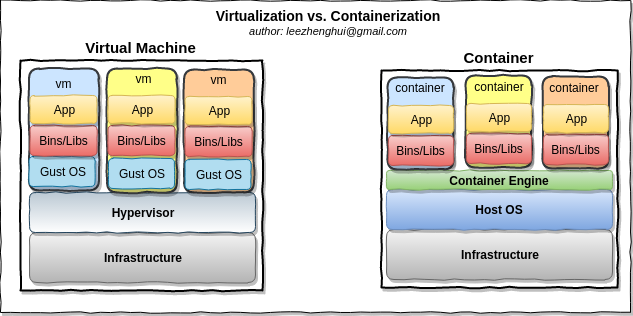
Container and virtualization provide similar resource isolation capabilities but in different ways.
-
Virtualizationabstract hardware, each VM includes a full copy execution stack including OS, binaries, libraries and Apps. -
Containerabstract the app packagess code and relevant dependences from userspace. Multiple containers run on the same machine and share the OS kernel instance. Each container is running as isolated process in user space. Compare with virtualization, container has much less overhead, take less space, less start time(almost instantly), in short, container is lighter weight and more portale than VMs.
Container technology become increasingly popular in cloud. Actually, it almost become the default option to setup isolation layer on PaaS-like paltform. I'd like to give explanations on it and underlying kernel features before we go further.
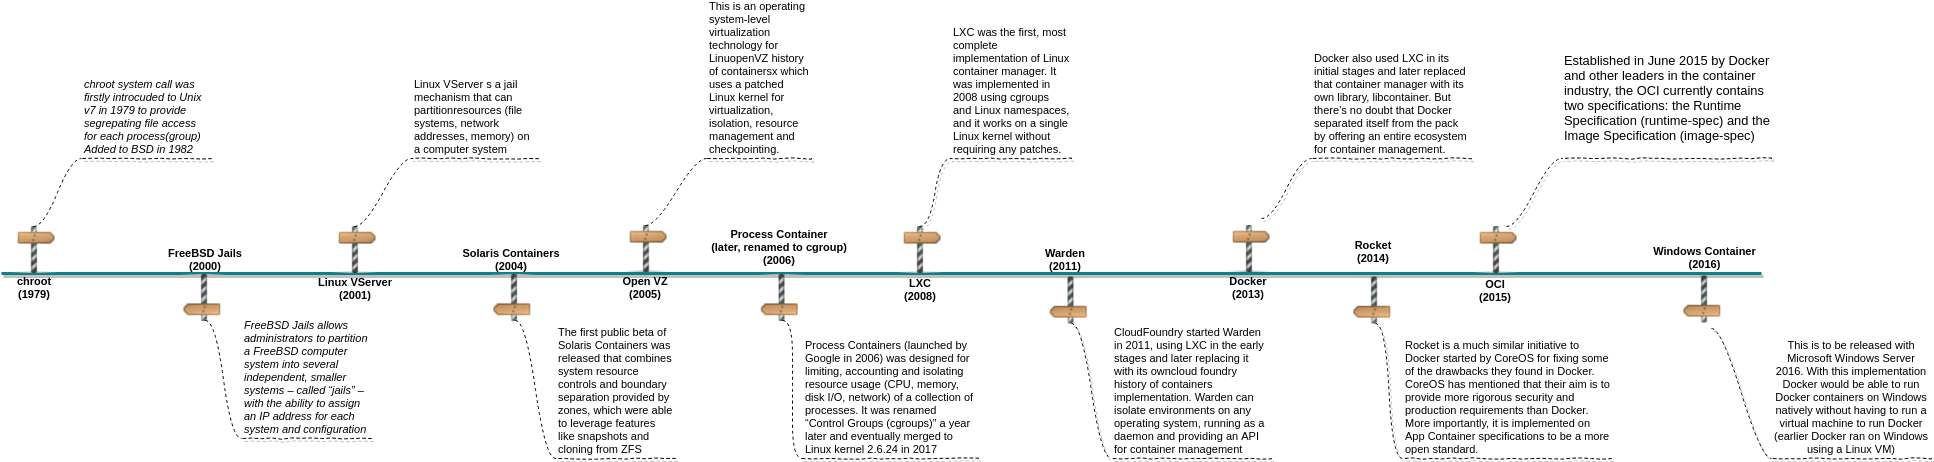
Container techology evolution
Below is a brief evolution of container technology
Under the hood of container
Linux kernel provides various features and components to support isolation from different aspects, includes: chroot, namesapces, cgroups and other things. Roughly speaking, tools like LXC, Docker and Rkt(Rocket) are wrappers around these low level kernel containment features and provide higher level powerful and easy-to-use API/tools, it lets the end users easily create and manage application containers. Having a better understanding of these low level features is greatly helpful to unerstand how container works internally, make a good sense of issue debugging in container infrastructure.
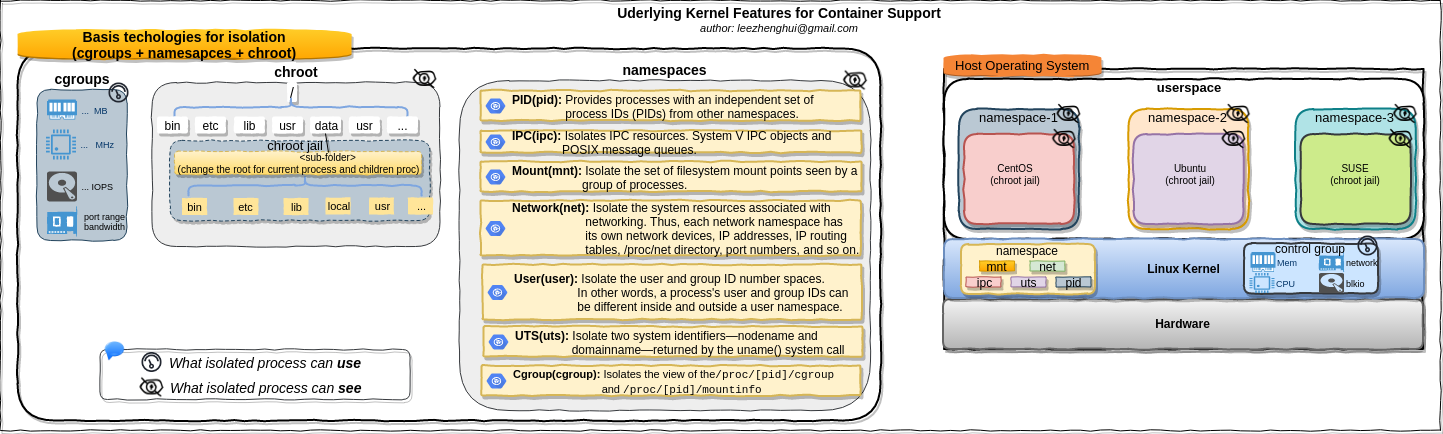
chroot
From wikipedia
A
chrooton Unix operating systems is an operation that changes the apparent root directory for the current running process and its children. A program that is run in such a modified environment cannot name (and therefore normally cannot access) files outside the designated directory tree. The term chroot may refer to the chroot(2) system call or the chroot(8) wrapper program. The modified environment is called achroot jail.
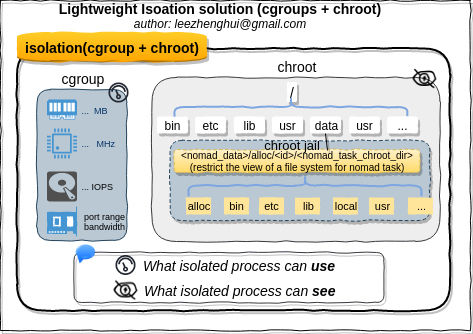
The chroot is a basic form of isolation at the filesystem level and restricts the view of a filesystem for process. If you have a linux environment, it is quite easy to try chroot(8) out.
Please refer to section chroot in practice for a step-by-step demo which will walk you through the basic usage of chroot.
Escaping chroot jail
It is possible to escape chroot-jail.
From document
" Calls to chroot() do not stack, with additional calls essentially overwriting the existing one. This call does not change the current working directory, so that after the call '.' can be outside the tree rooted at '/'. In particular, the superuser can escape from a 'chroot jail' by doing 'mkdir foo; chroot foo; cd ..'."
So in such a way, it is possible to escape chroot jail.
chroot just simply modifies pathname lookups for a process and its children, prepending the new root path to any name starting with '/'. Current directory is not modified and relative paths can refer any locations outside of chroot jail.
Please refer to section escaping chroot-jail for a step-by-step demo on the way of escaping chroot-jail with chroot(2), in the meanwhile, show you chroot(8) command which is a thin wrapper command to chroot(2), but it will potentially call chdir after chroot, so it prevents the escaping of chroot-jail via current working directory way.
pivot_root
chroot implmentation is fairly simple, it changes apparent root directory for current running process and its children without any change on the file system(mount tree), in the meanwhile, in Linux, '/' and '.' are just a shorthand for "current process' root" and "current process cwd", chroot() can break out, which result in the program escape to the real file system root, this could be a problem if you are looking for a solution to isolate the program in a jail and provide a per-user-filesystem trees.
In Linux, we can alternatively use pivot_root(2) in a private mount namespace(with patience for now, more details about namespace next sections) to achieve similar goal. chroot() simply points the process's filesystem root to a specified new directory, but pivot_root(2) actually change the root file system. In particular, it detaches the specified new_root directory (which must be a mount) from its mount point and attaches it to the process root directory. Since the mount tree has no parent for the new root, the system cannot be tricked into entering it like it can with chroot(). We will use the pivot_root() approach.
Some useful information from linux maillist which can help us to understand the expected behaviors of pivot_root and chroot, in particular to using these system calls in your programming.
From linux maillist
_This is why we have "pivot_root()" and "chroot()", which can both be used to do what you want to do. You mount the new root somewhere else, and then you chroot (or pivot-root) to it. And THEN you do 'chdir("/")' to move the cwd into the new root too (and only at that point have you "lost" the old root - although you can actually get it back if you have some file descriptor open to it).
The term
pivot_rootrefers to pivot_root(2) system call or pivot_root(8) wrapper program. It is Linux-specific and hence is not portable.

Please refer to section pivot_root in practice for a step-by-step demo which will walk you through the basic usage of pivot_root.
pivot_root vs. chroot
pivot_root provide an alternative approach for the purpose of changing root. We can copy an entire root filesystem to a new location and set the root there. However, since we want to do this without any impact to host system(including its mount points), we need a mount point isolation, kernel mount namesapce feature can achieve this for us. In short, chroot do the root change via fairly setting the root directory to a subtree of host file system, as opposed to chroot, pivot_root actually change the file system via mounting the new "/" to the expected location, which make the host file system fully invisible to the isolated processes in its own kernel mount namespace.
The pivot_root does the following:
- Let’s you specify an old and new root directory
- Copy the files from the old root directory into the new root directory
- Make the new root directory the current root
- This leaves the old root untouched, should any files need to be accessed.
Please refer to section Libcontainer move from chroot to pivot_root if you want to take a closer look at differents between chroot and pivot_root from implementation perspective.
Namespaces
Linux namespaces feature is for restricting visibilty.
From wikipedia
Namespaces are a feature of the Linux kernel that partitions kernel resources such that one set of processes sees one set of resources while another set of processes sees a different set of resources. The feature works by having the same name space for these resources in the various sets of processes, but those names referring to distinct resources. Examples of resource names that can exist in multiple spaces, so that the named resources are partitioned, are process IDs, hostnames, user IDs, file names, and some names associated with network access, and interprocess communication.
Namespaces kinds:
| Type | Since Kernel Version | Functionality | Flag |
|---|---|---|---|
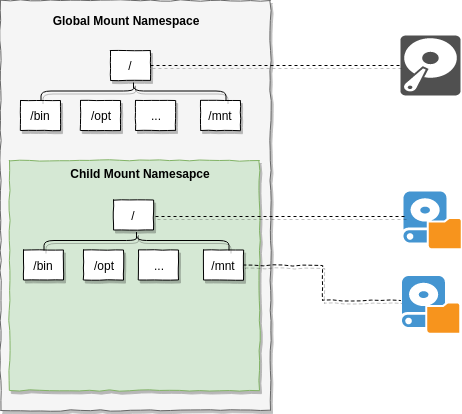
| Mount(mnt) | 2.4.19 | Isolate the mount points. A process has it's own moint points view, changes on the mount points will NOT be seen by other namespaces |
CLONE_NEWNS |
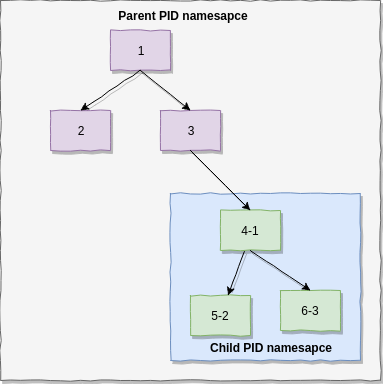
| Process ID(pid) | 2.6.24 | Isolate the process id number space. The processes in different namespaces may assign same id, but they can't see each other |
CLONE_NEWPID |
| Network(net) | 2.6.29 | Isolate the network stack/resources, eacho namesapce has a private set of IP addresses, it's own routing table, sokcet list and other network-related resources. |
CLONE_NEWNET |
| Interprocess Communication(ipc) | 2.6.19 | Isolates IPC resources. System V IPC objects and POSIX message queues. | CLONE_NEWIPC |
| UTS(uts) | 2.6.19 | Isolates the hostname and the NIS domain name, Calling sethostname(2) or setdomainname(2) is affecting only the namespace. |
CLONE_NEWUTS |
| User ID(user) | 3.8 | Isolates the user and group resources, unprivileged user in the "root" namespace can be a user ID 0 in the new namespace. When new user namespace is created the user gets full capabilities(7) inside the namespace. |
CLONE_NEWUSER |
| Cgroups(cgroup) | 4.6 | Isolates the view of the /proc/[pid]/cgroup and /proc/[pid]/mountinfo |
CLONE_NEWCGROUP |
e.g:
PID namespace
Mount namespace
Namespaces-related system calls
A process can be created in Linux by the fork(), clone() or vclone() system calls. In order to support namespaces, 7 flags (CLONE\_NEW*) were added. These flags (or a combination of them) can be used in clone() or unshare() system calls to create a namespace.
The namespaces-related system calls are listed below:
-
clone()creates a new process and a new namespace; the newly created process is attached to the new namespace. The process creation and process termination methods, fork() and exit(), were patched to handle the new namespace CLONE_NEW* flags.
-
unshare()Gets only a single parameter, flags. Does not create a new process; creates a new namespace and attaches the calling process to it.
-
setns()It is a system call to attache the calling process to an existing namespace; prototype:
int setns(int fd, int nstype);The
setnssystemcall allows a process to choose some of namespaces and share with others. e.g: two processes each has it's own PID namespace, but share a network namespace, like thePodbehavior in Kubernetes.
Please note nsenter(1) is the command line equivalent of setns(2) and unshare(1) is the equivalent of unshare(2) syscall.
Please refer to section namespaces in practice for the practical samples:
-
The sample based on
diyCwhich will show you the system call usages of namesapces. -
The sample based on command line
unshareandnsenterwhich will show you the basic commands usage in namespace.
chroot vs. mount namespace
For Mount namespace, linux also maintains a data structure for all the mountpoints of the system. It includes information like what disk partitions are mounted, where they are mounted, whether they are readonly, et cetera. With Linux namespaces, one can have this data structure cloned, so that processes under different namespaces can change the mountpoints without affecting each other.
Creating separate mount namespace has an effect similar to doing a chroot(). chroot() is good, but it does not provide complete isolation, and its effects are restricted to the root mountpoint only. Creating a separate mount namespace allows each of these isolated processes to have a completely different view of the entire system’s mountpoint structure from the original one. This allows you to have a different root for each isolated process, as well as other mountpoints that are specific to those processes. Used with care per this tutorial, you can avoid exposing any information about the underlying system.
Cgroups
From redhat doc
The control groups, abbreviated as cgroups, are a Linux kernel feature that allows you to allocate resources — such as CPU time, system memory, network bandwidth, or combinations of these resources — among hierarchically ordered groups of processes running on a system. By using cgroups, system administrators gain fine-grained control over allocating, prioritizing, denying, managing, and monitoring system resources. Hardware resources can be smartly divided up among applications and users, increasing overall efficiency.
Not like namespace provide per process resource isolation solution(what can see), cgroups provide resource management solution(what can use). Please note Cgroups is not dependent upon namespaces, we can build cgroups without namespaces kernel support. cgroups use a virtual file system, all cgroups actions are performed via filesystem operations, including create/remove a directory, read/writ files to it, mount options. In order to use it, cgroups filesystem must be moounted. The cgroups file system can be mounted anywhere on the file system, By default, Systemd mount it at /sys/fs/cgroup. Each folder under /sys/fs/cgroup is a subsystem in cgroups. All of entries in it are not persistent and deleted after reboot.
Some of subsystems are listed here:
- blkio - limits on IO
- cpu - cpu scheduling
- cpuset - assigns CPU(s)n on multicore systems
- devices - controls access to devices
- memory - memory limits like rss, swap etc.
ubuntu@ubuntu-xenial:~$ ls /sys/fs/cgroup/

blkio  cpuacct      cpuset   freezer  memory   net_cls,net_prio  perf_event  systemd
cpu    cpu,cpuacct  devices  hugetlb  net_cls  net_prio          pids
There are actually two versions of the implementation v1 and v2 where the main difference is that v1 operates on thread level but v2 is simpler and considers only processes.
Please refer to section cgroups in practice for a practical sample which walk you through the basic usage of cgroups.
The container is a mainstream topic in cloud, We explored them with practicial examples for the underlying techonlogies, this does not only help us understanding how the container works under the hood, but also can help us make more correct decision on technology strategy in each growth phases.
Orchestrator
The output from packing layer is deployable artifact. How to make these artifacts running on a distirbuted environment with an allocation of necessary resources(ie: CPU, memory, disk, network) and service level resoruces isolation, that is the major responsibility of orchestrator and resource manager system. Deploying and running a application on a server is straightforward, but in MSA, the orchestration is very challenging, as it need to address the problems like: How do we allocate server resources(scattered across large geographical areas) like CPU and memory to all these deployable jobs? How do we update and scale our services without downtime? How to co-work with loadbalancer/gateway to achieve feature like blue/green deployment or canary release. How to provide a mechanism to running the job in co-processor or sidecar mode, which have been proved to be an important feature to put down some cross-cutting concerns(e.g: resilient, observable and load-balancing service communication) solution to a lower inftrastructure layer, etc.
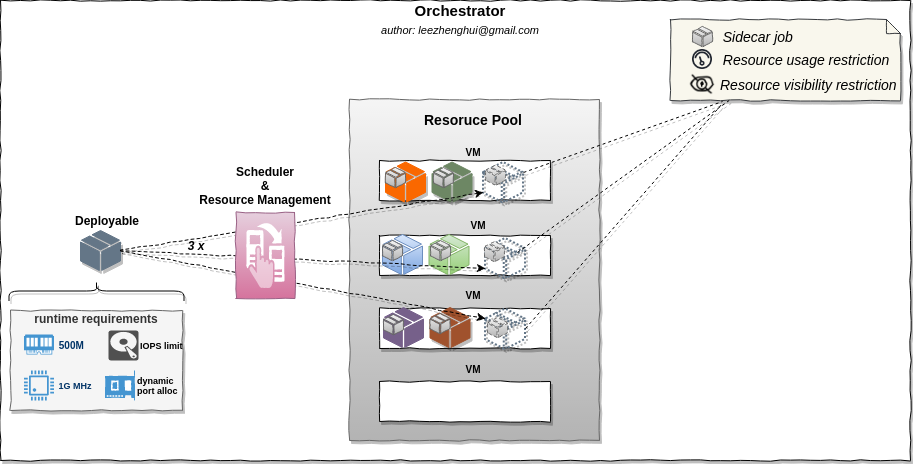
Today, AFAIK, there are four major orchestration vendors, Kubernetes, Mesos, Docker Swarm and Nomad.
- Kubernetes
Kubernetes is an orchestration system for containers originally designed by Google, now governed by the Cloud Native Computing Foundation (CNCF) and developed by Google, Red Hat, CoreOS and many others. Kubernetes aims to provide all the features needed to run Docker or Rkt-based applications including cluster management, scheduling, service discovery, monitoring, secrets management and more. Instead of scheduling docker containers, Kubernetes schedules custom structures called Pods. A Pod simulates a group of containers running on the same host with a shared port range and storage. This gives developers the option of either scheduling services each in their own Pod or all in one Pod, depending on the level of coupling desired. This structure also fits into Kubernetes’ well designed IP per Pod networking model, allowing pods to be “treated much like VMs or physical hosts from the perspectives of port allocation, networking, naming, service discovery, load balancing, application configuration, and migration.”
- Mesos with Aurora, Marathon
Mesos is a resource manager, which is used to pool together the resources of a datacenter and exposes an API to integrate with Frameworks that have scheduling and job management logic. Mesos depends on ZooKeeper to provide both coordination and storage. There are many different frameworks that integrate with Mesos; popular general purpose ones include Aurora and Marathon. These frameworks allow users to submit jobs and implement scheduling logic. They depend on Mesos for resource management, and external systems like ZooKeeper to provide coordination and storage.
- Docker Swarm
Docker Swarm is the native clustering solution for Docker. It provides an API compatible with the Docker Remote API, and allows containers to be scheduled across many machines.
- Nomad
Nomad combines the features of a resource manager and a scheduler. As a resource manager, Nomad collects information on the available resources and capabilities per host. As a scheduler, the central Nomad servers(raft based consensus network) use this information to make optimal placement decisions when jobs are submitted. It is designed for easy adopting to different cloud-infrastrcuture, well-distributed, highly available and operationally simple orchestration abstraction that supports virtualized, containerized(Docker, Rkt), and standalone applications, also, from implemention perspective, Nomad is design with extensible drivers, we can extend scheduler driver to support a customzied deployable runner. The scheduling unit in Nomad is called "job", each job can contains a series tasks in a group. These tasks are deployed and running on same host, these tasks can share with a local disk folder – "alloc directory". Not like Kubernetes which is designed as a collection of more than a half-dozen interoperating services which together provide the full functionality. Nomad is single executable binary, easy for operation.
In addition, on Linux, Nomad provides a ligthweight isolation solution "chroot + cgroup" which is suitable for the scenario on a prviate cloud with trusted applications.
Communication(calling service) in MSA
In monoliths, the communication between components actually will turn to the function call within the same process space. The compiler and linker help on the translations between virtual memory address marker to the function symbols. From SOA point of view, there are not many external services dependences, so we can hardcode the dependences static IP/Port in configuration files. We also can put a LB in front of these monolith/SOA instances for a horizontal-scaling, all of these are fine. But after we adopt the application to microservices pattern. All above options are unacceptable.
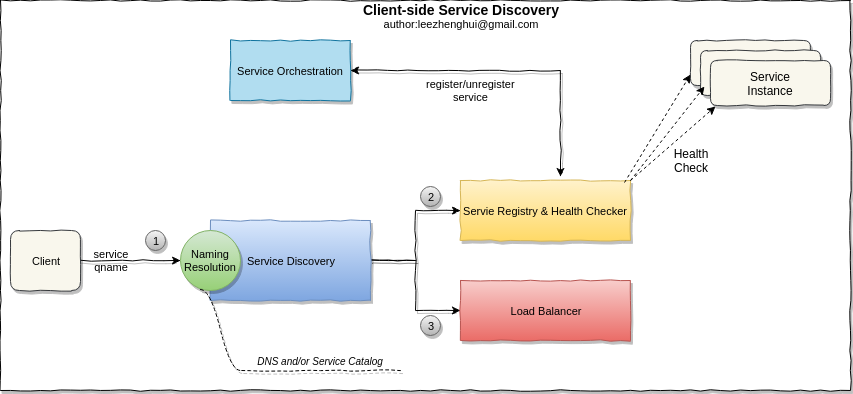
Client-side service discovery
The communication between services is based on the endpoint address(IP:Port). The infrastructure is becoming more dynamical, we can't assume a static endpoint address for each service instance, in reality, the service instance lifecycle can be changed at any time on-the-fly. The more challenging thing is that multiple instances of the same service are often running simultaneously in a MSA, for an invocation, we also need a load balancer who is able to keep getting updated on health status of each service instances and dispatch a request to a service instance based on the workload distribution.
Below is a brief workflow for a client-side service discovery, it resolves naming resolution(optional), service registry and load balancer(for adaptive routing) components.
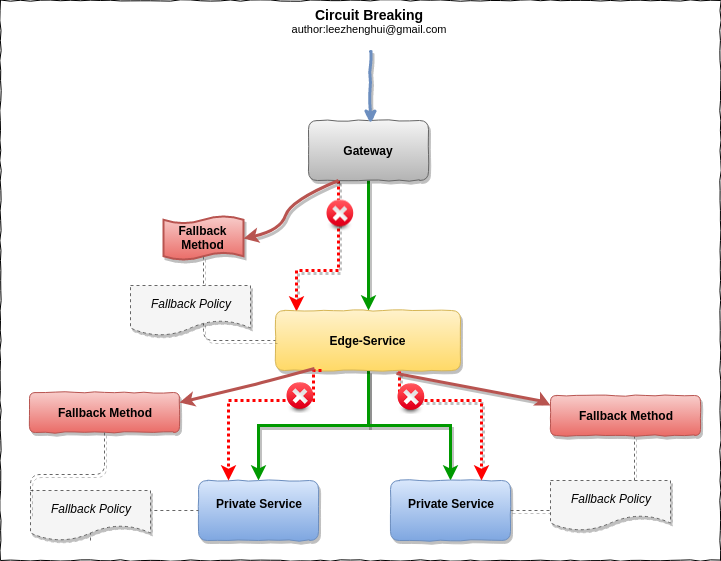
Circuit breaker
After breaking down a monolith into smaller services and running the serivces instances on a dynamic infrastructure, we can't assume that we can avoid problem occurs. Indeed, we need embrace the fact – failure may occurs at anytime, what we need to do is to prevent the failure in the first place, avoid it cascading to upper components and provides a bottom-up resilience to the application.
Circuit Breaker pattern is the one which can bring us benefits in this area.
From Martin Fowler
"The basic idea behind the circuit breaker is very simple. You wrap a protected function call in a circuit breaker object, which monitors for failures. Once the failures reach a certain threshold, the circuit breaker trips, and all further calls to the circuit breaker return with an error, without the protected call being made at all. "
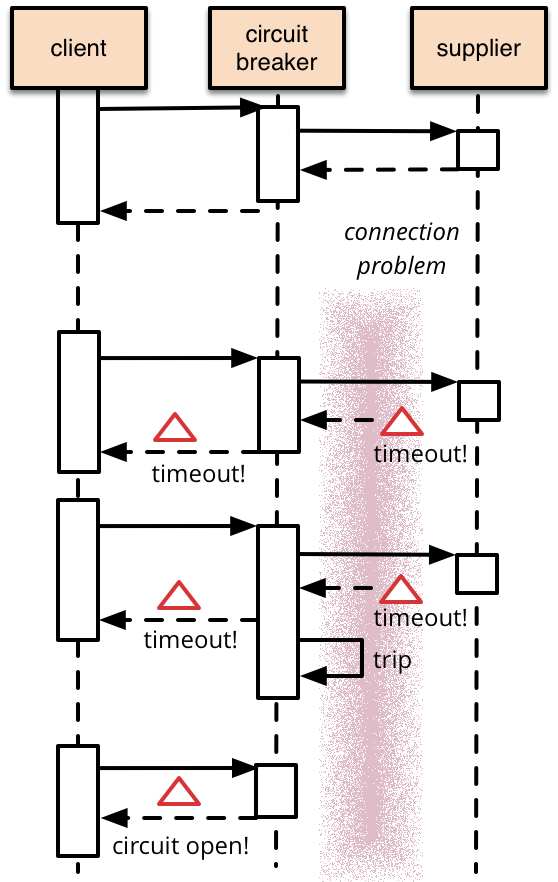
The circuit-breaker can be turned on at gateway, edge-services and private servies.
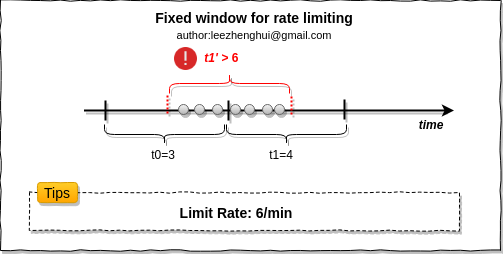
Traffic shaping
The burst requests sometime may break the system, we need a rate limiting mechanism to protect upstream components for this kind of situation. Traffic shapping can bring benefit on this. Typically, there are four algorithms for rate limiting:
-
Fixed window
This is the most simple algorithm for rate limiting. Interal counting, but the drawback is at the interval boundaries, which may exceed the limiting. I guess below picture worth 1k words. :-)
-
Sliding window
Imaging we want to limit request rate to 10/min, we count every 20s. In the sliding window algorithm, for each timestamp,
total count=previous+current, for timestamp-T0, it is 8, it is in allowed scope, T1 = 11, it exceeds limited count, so one request will be discarded.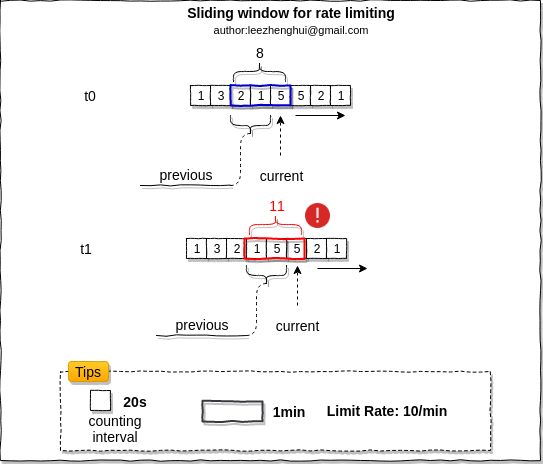
-
Leaky bucket
From link
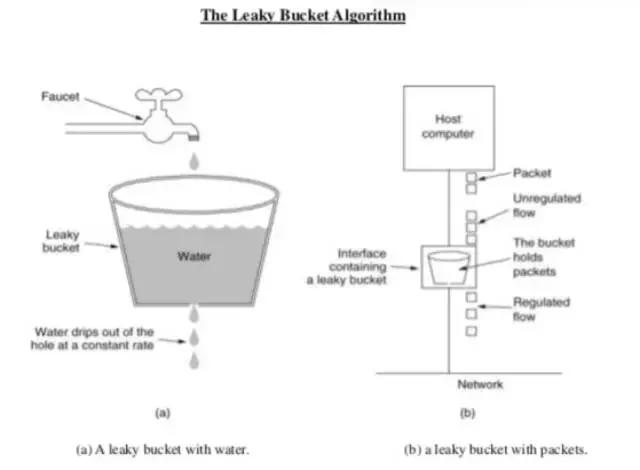
Steps:
- When the host has to send a packet , packet is thrown in bucket.
- Bucket leaks at constant rate.
- Bursty traffic is converted into uniform traffic by leaky bucket.
- In practice bucket is a finite queue outputs at finite rate.
-
Token bucket
From link
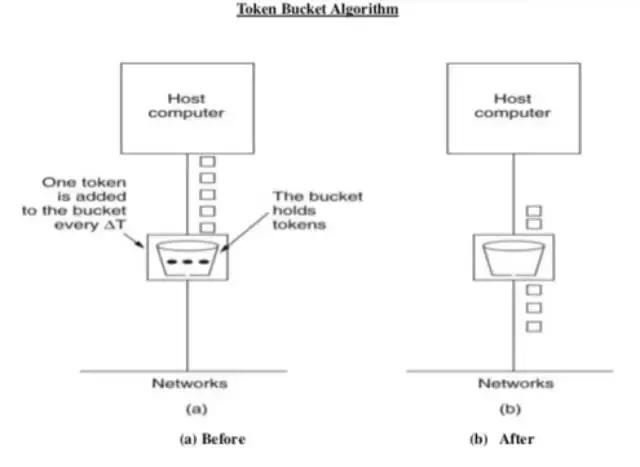
- In this leaky bucket holds tokens generated at regular intervals of time.
- Bucket has maximum capacity.
- If there is a ready packet , a token is removed from Bucket and packet is send.
- If there is a no token in bucket, packet can not be send.
Compare two algorithms, the leaky bucket always sends the packages at constant rate, but the token bucket can guarantee to send the packages at constant average rate.
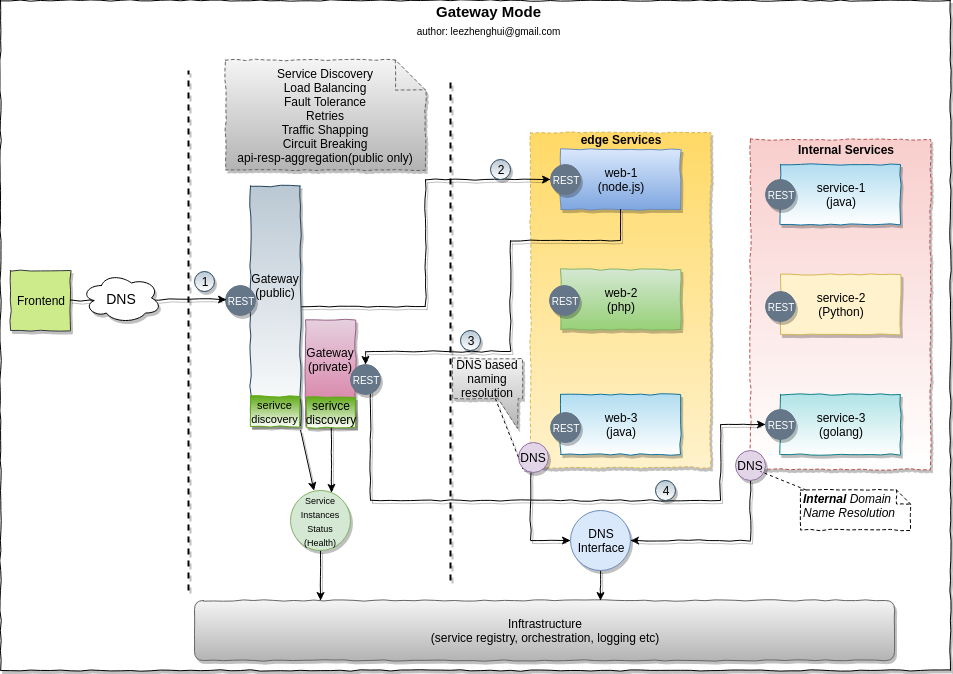
Edge-Service gateway
Edge-service is called directly by the external clients, the problems mentioned above also apply to the edge-services, how we resolve the service locate problem for these services? We often address the problem via server side service discovery pattern, means put a gateway between the external client and edge-services. The gateway encapsulates the internal system architecture and do the service discovery,load balancing, circuit breaking, traffic shapping for the external clients. Sometimes, the request to API gateway may involve multiple backend services calls, API gateway may provide the capability to aggregate the results for client to reduce the interaction count between the external service and edge services.

Distributed tracing
After splitting monolith into micrservices, the request often span muiltiple services, each service has multiple instances scattered at different physical nodes and running simultaneously. It become every hard to tracking a invocation flow, understand the behavior of application and troubleshoot problems. For example, there is a in doubt request take a long response time occasionally, how to monitor the response time for each service instance participated in the invocation flow? Distributed tracing is the solution for this.
There are some programming language-specific solutions for distributed tracing. But if your MSA (will)involve multiple programming languages, it is highly suggested to follow OpenTracing(standardized API for distributed tracing) in your application. Both Zipkin and Jaeger are most popular distributed tracing system with OpenTracing API support.
Broadly speaking, to implement an distributed trace, we need two parts of work:
- Data model which can link an invocation flow
Today, Most data models for tracing descend from Google’s Dapper paper. OpenTracing use the similar terminologies.
- Trace: The description of a transaction as it moves through a distributed system.
- Span: A named, timed operation representing a piece of the workflow
- The span context contains the trace identifier, span identifier, and any other data that the tracing system needs to propagate to the downstream service
- Instrument The instrument is responsible for generate/propagate distributed trace at the invocation boundaries.
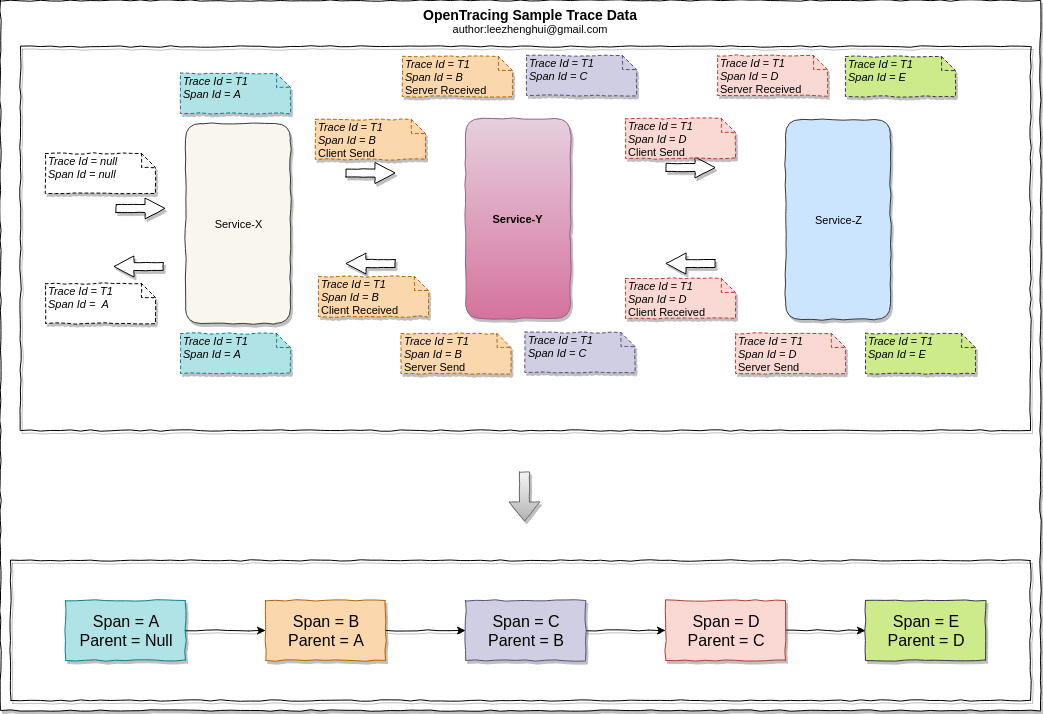
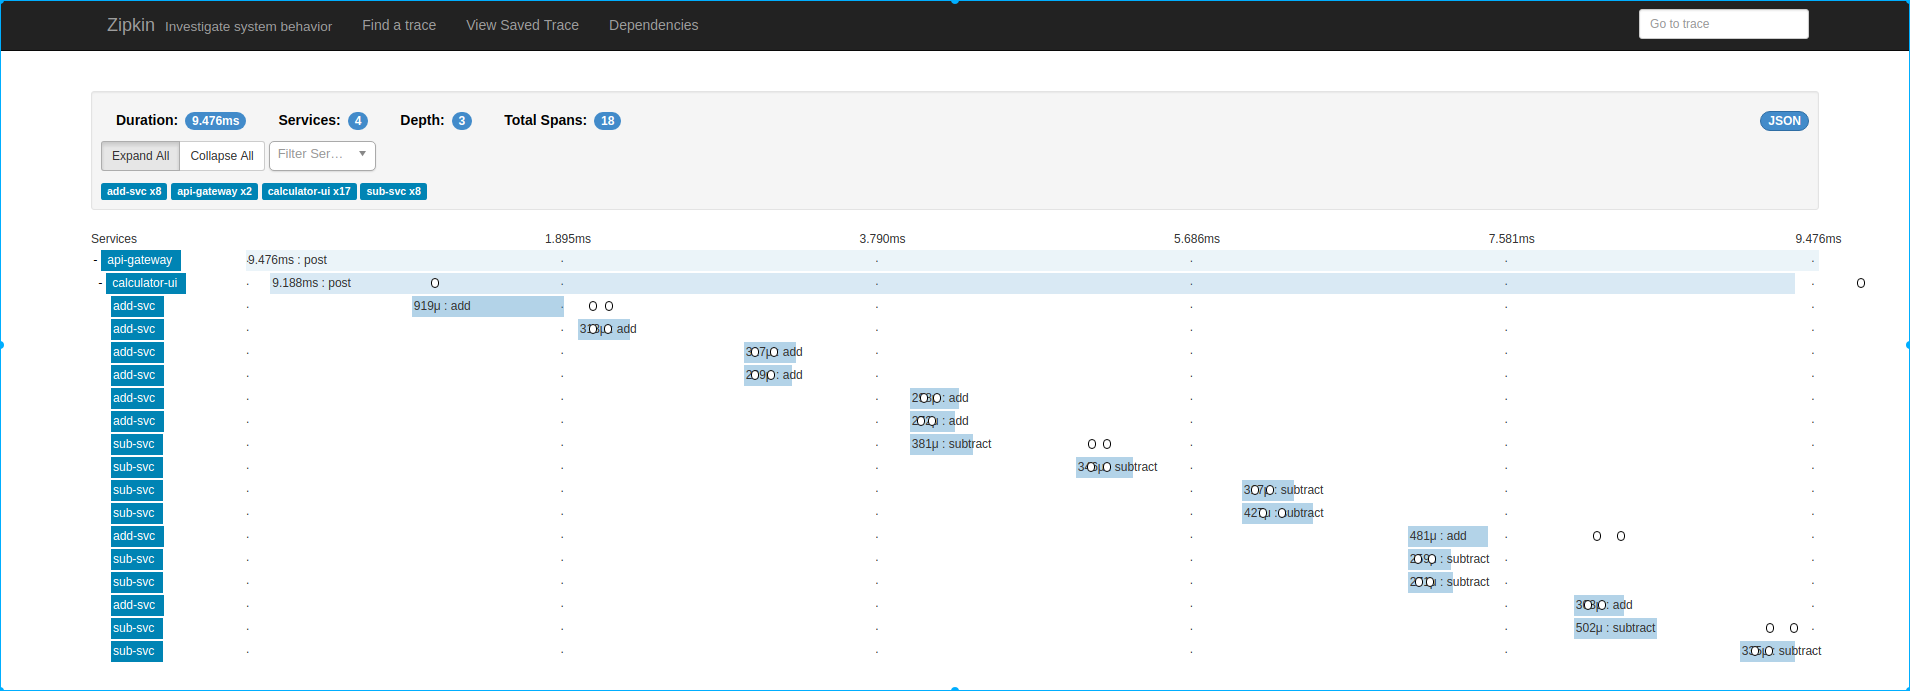
A sample distributed trace based on Zipkin:
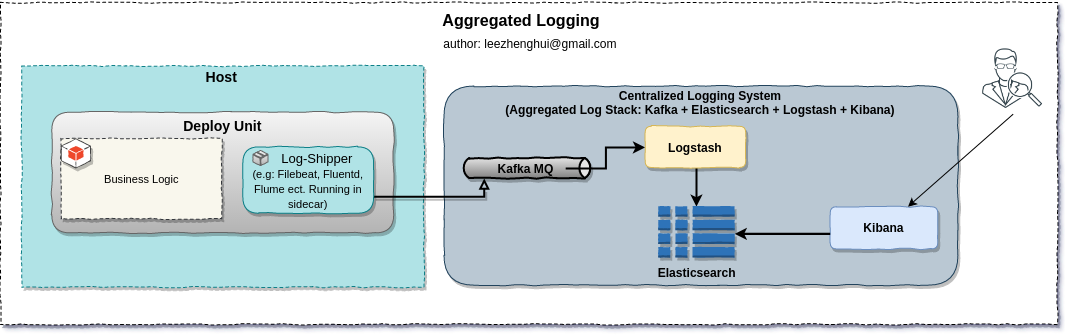
Aggregated logging
In MSA, as the service instances are scattered at entire network node and running simulaneously, it become hard to go through the whole logs per service. Instead of SSHing to each nodes to aggregate the log, We want the logs from different nodes being streamed into a centralized storage and easy for query/processing. Generally, this feature should work injunction with orchrestrator via sidecar or co-procees pattern.
E.g: put a log-shipper in sidecar which responsible for streaming logs to Kafka and finally be consumed by ELK(stands for the combination of Logstash, Elasticsearch and Kibana).
Reference modes for MSA service communication
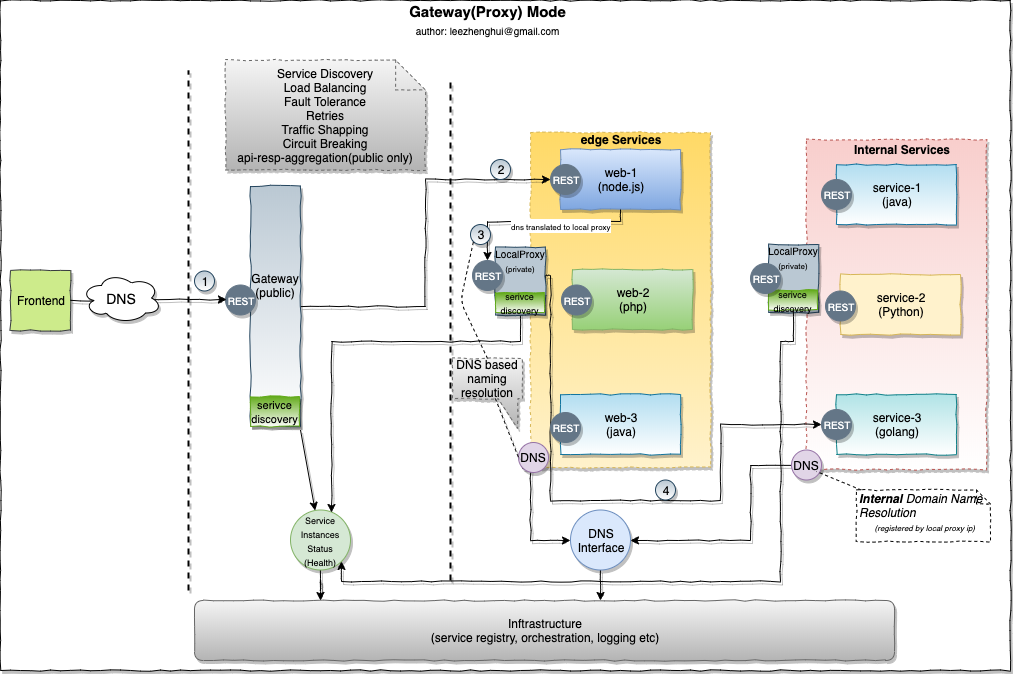
Gateway mode
Centralized internal service proxy
Per-node internal service proxy
-
Pros and Cons
Pros Cons Multiple languages support
Limited for lightweight common cummunication protocol.
e.g: RESTful, gRPC
Introduce (per-node)centralized connection point in network topology
Although it eaily can be horizontally scaled
Introduce one more hop per communication,
has performance impact
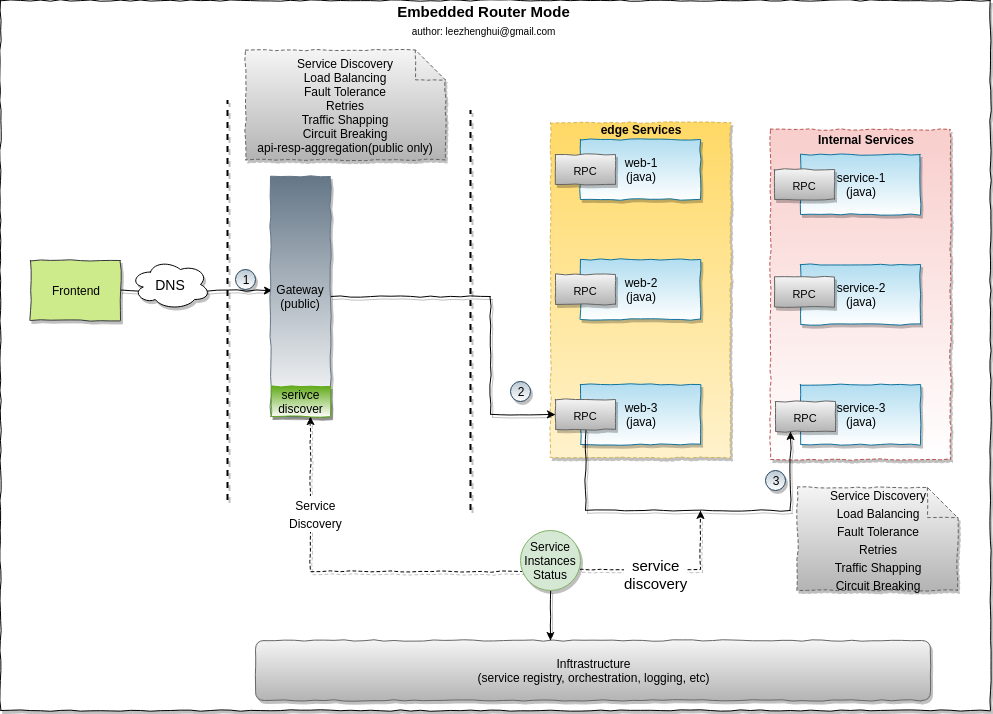
Embedded router mode
-
Pros and Cons
Pros Cons
Support multiple communication protocol,
even for customized protocolProgramming language specific,
not easy to promote in cross-languages caseMinimize communication hop
The communication cross-cutting concerns implementation(commonly be delivered as part of RPC Framework)
is packaged/coupled with business logic,
Router upgrade can't run in agility/independence.
Service mesh mode
-
Pros and Cons
Pros Cons
Programming languages neutralSo far, limited to lightweight protocol mainly based on HTTP(s),
Support customzied protocol need invest much on sidecar proxy implementation, may need to implement your own proxy to achieve this.Communication cross-cutting concerns logic put down to inftrastructure layer
and is totally decoupled from business logicIntroduce two more hops per communication.
Performance impact need more attentions.
Typically, the traffic routing strategies include transparent forwarding and explicitly call, both them need work in injunction with orchestrator.
-
transparent forwardingneeds involve the traffic hijack setting(e.g: via iptables or BPF/XDP) during the initial phase of service orchestration.In linux, there are two typical approaches to enable transparent proxy via iptables -
iptables + REDIRECTandiptables + TProxy. The way of getting original destination is quite different in both approaches. If you are interested in this, please refer to section transparent proxy with iptables for more details. -
explicitly callneeds a detailed bootstrap contract between orchestrator and application. Application accept these parameters(e.g: via environment variables) during bootstrap, get each endpoint address of local sidecar proxy for the target services and talk to these endpoint addresses just like talking to remote services directly.
DevOps Concerns
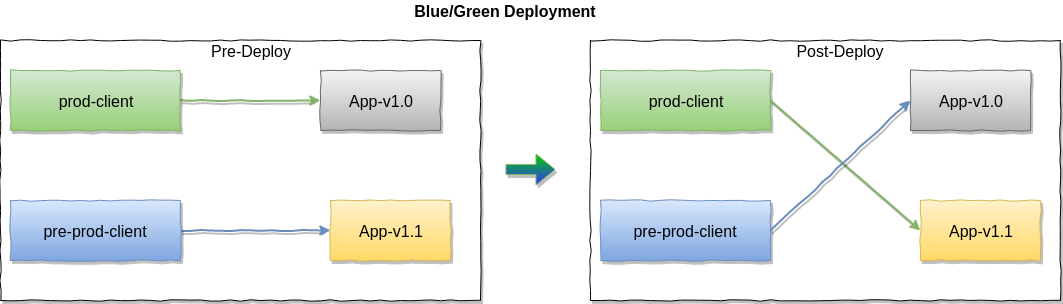
Blue/Green Deployment
Blue/Green release provide a deployment strategy of releasing an application in a predictable manner with the benefit of a quick way to roll back environment if any issue observed by monitor. The infrastructure need to provide two identical environments. At any given time, only one of them is running production, the other one is preparing for version next deployment. When a new release is ready on the non-production environment, the role of them switch(e.g: load balancer/gateway point to the new release environment), in the meanwhile, the former production environment will hold on(in standby) for for a while, if anything does not work on production, we can quickly rollback to former production evnironment. Blue/Green deployment is a none-or-all switch. The data layer rollback or migration should also be fully taken account of before your application rollback. Also need a graceful switch solution if you have a scenario keep a long-alive connection with clients.
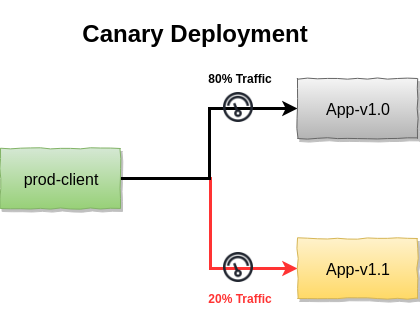
Canary Release
Canary release provide an other strategy which allow specific amounts of traffic to the new version application. The similar data layer concerns from blue/green deployemnt apply to this deployment strategy too.
Noramlly, we can either rely on the orchestration capability or gateway weight based load balancing to achieve this feature.
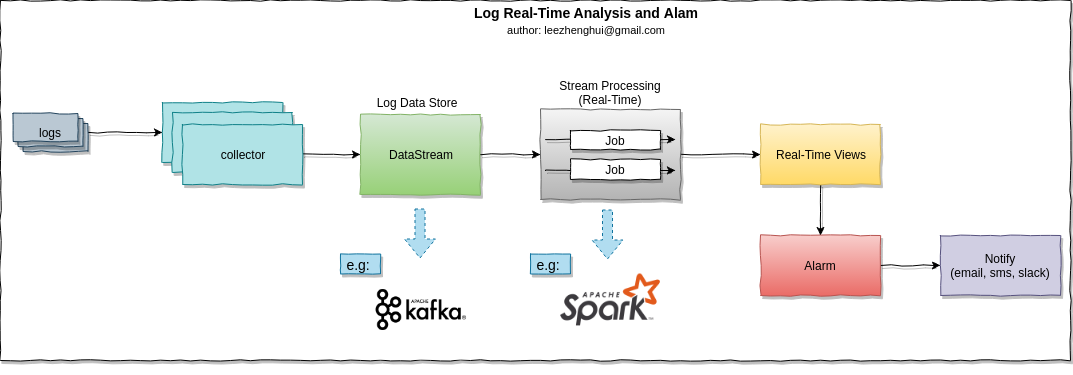
Log real-time analysis
In MSA, the opertion team do need a real-time monitor to report the API invocation status and capture the exceptions in time. Especially, for blue/green and canary deployments, the sooner we find out the failure, the faster we can rollback the environment. we can introduce big data processing to resolve the problem. Kappa Architecture which is a simplification of Lambda Architecture can fulfill the requirement for us.
How to decide a orchestrator?
To make a decision, you need to ask youself by below questions:
-
Can we achieve a fully containerization on all of applications(both legacy and new created)
-
How many resources your corporation can invest to operation team.
-
Is there any operation tool still not easy being automated due to limitation of container on a lower version of linux kernel. E.g: perf_event in container.
-
If you are moving from SOA, what existing service ecosystem your products are built upon? e.g: service registry, secured configuration solution, etc.
Make decision always be hard, we need to do the balance and tradeoff from both technical and investment perspectives. From purely technical perspective, Kubernetes is best if we can accomplish fully containerization, but we also need to tradeoff more from other aspects. Let me recall the journey of making the decision on this in our team.
I remembered, from development team perspective, fully containerization is an favorable option, at that time, we already had a DevOps system which allow developer to deploy their serivce by simply pushing the code to repository. All of complexicy of cluster inftrastucture and network concerns are transparent to them, in the meanwhile, developers are able to interact with deployment by specifying the resources need by the application, viewing the services logs for problem debugging purpose. All of these will NOT be changed after a fully containerization, and one more benefits is, doing this will make a local integration testing easier for them. But mainly concerns came from operation team. Especially, most startups have 1-2 ops people, maybe begin with a fledgling team, make the infrastructure simple/stable will speed up the product delivery and make an efficient troubleshooting. In addition, we have some node.js services on the backend for web rendering, operation team like the flamegraph based perf sampling analysis on these services for performance analysis, if we move to container on these services, that will break the automated tookit. Indeed our DevOps team would like to embrace container, just want to figure out a more gradual evolution way to achieve fully containerization. For the service discovery and secured configuration store, we already used Consul and Vault on our production environment.
Based on above investigation, we went with Nomad. One thing I need to clarify is, Some of considerations comes from a startups point of view, but that DOES NOT mean Nomad is only suitable to startups. Indeed, we just leverage some of Nomad design benefits to enable us running our services in a mixed-type mode, e.g: the excellence design of Nomad enable it running on an cloud-infrastructure independent environments, extensible scheduler drivers make it can adopt to VM, container, standalone application or customzied typed of runners. Provides flexible isolation solutions(e.g: chroot + cgroup as ligthweight solution on a private cloud with trusted applications) for different usage scenarios. Nomad's C1M Design provides the powerful scheduling capability, 1,000,000 containers on 5,000 nodes in under 5 minutes. Kubernetes documentation states they can support clusters greater than 5,000 nodes and they support a multi-AZ/multi-region configuration. Nomad has been proven to scale to cluster sizes that exceed 10,000 nodes in real-world production environments.
Wrapping up
In this post, I introduce the runtime challenges in MSA, including, packing layer, orchestration layer and communication layer concerns. Exploring the container underlying technologies via practical examples, explained three reference modes(gateway mode, embedded router mode and service mesh mode) for MSA communications. At the end of post, I also give my answer on the question how to make decision on scheduler.
From next post, I will use 3 ~ 4 posts to take hands-on practices for each communication reference mode. and after that, we will get to the data part challenges.
Appendix
Chroot in practice
- Create a folder with name rootfs
mkdir rootfs
- Copy the necessary system bins/libs to the fold of
rootfs, including:
├── bin
├── etc
├── lib
├── lib64
├── run
├── sbin
├── tmp
└── usr
- Run
topcommand in chroot jail
# running in host
chroot ./rootfs /bin/bash
mkdir /proc
mount -t proc proc /proc
top
- Share file between chroot jail and host
- "link" a folder into chroot jail:
# running in host mkdir shared echo "shared folder between host and chroot jail" > ./shared/readme mkdir $PWD/rootfs/shared mount --bind -o ro $PWD/shared $PWD/rootfs/shared - The shared fold can be seen within chroot jail
# running in chroot jail chroot ./rootfs /bin/bash more /shared/readme - Unmount the shared folder
# running in host
umount $PWD/rootfs/shared
- Exit chroot jail
exit
umount --recursive ./rootfs/proc
Escaping chroot-jail in practice
Generally, to escape chroot jail, we can follow below steps in our source code (from chroot-break):
- Create a temporary directory in its current working directory
- Open the current working directory Note: only required if chroot() changes the calling program's working directory.
- Change the root directory of the process to the temporary directory using chroot().
- Use fchdir() with the file descriptor of the opened directory to move the current working directory outside the chroot()ed area. Note: only required if chroot() changes the calling program's working directory.
- Perform chdir("..") calls many times to move the current working directory into the real root directory.
- Change the root directory of the process to the current working directory, the real root directory, using chroot(".")
Before experiment the escaping in a program, let's do a test on the chroot(8) command wrapper firstly:
- Run chroot with
--skip-chdir
--skip-chdir is an option for chroot(8), let see what will happen if we specify this option
chroot --skip-chdir ./rootfs /bin/bash

[result]:
  chroot: option --skip-chdir only permitted if NEWROOT is old '/'
  Try 'chroot --help' for more information.
The chroot command wrapper actually will force to do the chdir if the new root different than the old '/'. So it make no sense to follow the above steps to escape chroot jail.
But the chroot() system call perform this without a chdir operation. What chroot() actually does is fairly simple, it modifies pathname lookups for a process and its children so that any reference to a path starting '/' will effectively have the new root, which is passed as the single argument, prepended onto the path. The current working directory is left unchanged and relative paths can still refer to files outside of the new root. In addition, Calls to chroot() do not stack, with additional calls essentially overwriting the existing one. So, a superuser can escape from a "chroot jail" by doing iterate chdir() with a ".." and get to the real "/" outside of chroot jail, finally execute chroot on that cwd(point to real "/") to escape the chroot jail. I verified this on ubuntu-kernel 4.4.0 with a test sample escape_chrootjail.c.
# running in chroot jail
gcc escape_chrootjail.c -o escape_chrootjail
./escape_chrootjail
ls

[result]:
bin  boot  data  dev  etc  home  initrd.img  initrd.img.old  lib  lib64  lost+found  media  mnt  opt  proc  root  run  sbin  snap  srv  sys  tmp  usr  vagrant  var  vmlinuz  vmlinuz.old
Similarly, if folder is moved out of chroot jail, attacker can exploit that and simpily chdir(2) to that folder after it was moved out, and escape the chroot jail.
Pivot_root in practice
Let's try with pivot_root(8) command wrapper, and make a quick sense of how it works.
- Create a jail folder with tmpfs file system and make a bind mount for share files between host and jail
sudo -s
mkdir ./jail
mount -n -t tmpfs -o size=1200M none ./jail
mkdir ./jail/shared
mount --bind -o ro $PWD/shared $PWD/jail/shared
touch ./jail/iamjail
mkdir ./jail/orig-root
- Copy the necessary system bins/libs to the fold of
jail, including:
/
├── bin
├── etc
├── lib
├── lib64
├── run
├── sbin
├── tmp
└── usr
- Show the mounts before run pivot_root
cat /proc/$$/mounts

[result](cut down unconcerned items)
proc /proc proc rw,nosuid,nodev,noexec,relatime 0 0
/dev/sda1 / ext4 rw,relatime,data=ordered 0 0
vagrant /vagrant vboxsf rw,nodev,relatime 0 0
none /home/ubuntu/jail tmpfs rw,relatime,size=1228800k 0 0
/dev/sda1 /home/ubuntu/jail/shared ext4 ro,relatime,data=ordered 0 0
tree -L 1

[result]
jail
├── bin
├── etc
├── iamjail
├── lib
├── lib64
├── orig-root
├── proc
├── run
├── sbin
├── shared
├── tmp
└── usr
- Run pivot_root
cd ./jail
unshare -m
pivot_root . orig-root
mount -t proc proc /proc
# running in pivot\_root()ed process
cd /
tree -L 1

[result]
/
├── bin
├── etc
├── iamjail
├── lib
├── lib64
├── orig-root
├── proc
├── run
├── sbin
├── shared
├── tmp
└── usr
# running in pivot_root()ed process
cd /orig-root
tree -L 1

[result]
.
├── bin
├── boot
├── data
├── dev
├── etc
├── home
├── initrd.img -> boot/initrd.img-4.4.0-134-generic
├── initrd.img.old -> boot/initrd.img-4.4.0-133-generic
├── lib
├── lib64
├── lost+found
├── media
├── mnt
├── opt
├── proc
├── root
├── run
├── sbin
├── snap
├── srv
├── sys
├── tmp
├── usr
├── vagrant
├── var
├── vmlinuz -> boot/vmlinuz-4.4.0-134-generic
└── vmlinuz.old -> boot/vmlinuz-4.4.0-133-generic
# running in pivot_root()ed process
cat /proc/$$/mounts

[result](cut down unconcerned items)
/dev/sda1 /orig-root ext4 rw,relatime,data=ordered 0 0
proc /orig-root/proc proc rw,nosuid,nodev,noexec,relatime 0 0
vagrant /orig-root/vagrant vboxsf rw,nodev,relatime 0 0
none / tmpfs rw,relatime,size=1228800k 0 0
/dev/sda1 /shared ext4 ro,relatime,data=ordered 0 0
proc /proc proc rw,relatime 0 0
- unmount shared folder
# running in pivot_root()ed process
cd /
umount --recursive ./shared

[result]
The /shared folder is unmounted in the pivot_root()ed namespace
- show mounts from outside of pivot_root()ed
# show the mounts with a new login
mount

[result](cut down unconcerned items)
/dev/sda1 on / type ext4 (rw,relatime,data=ordered)
vagrant on /vagrant type vboxsf (rw,nodev,relatime)
none on /home/ubuntu/jail type tmpfs (rw,relatime,size=1228800k)
/dev/sda1 on /home/ubuntu/jail/shared type ext4 (ro,relatime,data=ordered)

Notable, we can still see the shared mountpoint from this namespace
- unmount orig-root
# running in pivot_root()ed process
umount --recursive /orig-root

# if prompted with target busy, you can use fuser to check which process is using the mountpoint
# e.g:
fuser -mv /orig-root
Libcontainer move from chroot to pivot_root
A good reference sample of using pivot_root(8) is libcontainer, docker ever changed the implementation from chroot to pivot\_root, below is the details for this change in golang.
libcontainer: Use pivot_root instead of chroot
Instead of keeping all the old mounts in the container namespace and just using subtree as root we pivot_root so that the actual root in the namespace is the root we want, and then we unmount the previous mounts.

This has multiple advantages:

* The namespace mount tree is smaller (in the kernel)
* If you break out of the chroot you could previously access the host filesystem. Now the host filesystem is fully invisible to the namespace.
* We get rid of all unrelated mounts from the parent namespace, which means
  we don't hog these. This is important if we later switch to MS_PRIVATE instead
	of MS_SLAVE as otherwise these mounts would be impossible to unmount from the
  parent namespace.
The code changes is as below:
import (
 	"fmt"
 	"github.com/dotcloud/docker/pkg/system"
+	"io/ioutil"
 	"os"
 	"path/filepath"
 	"syscall"
@@ -51,16 +52,29 @@ func setupNewMountNamespace(rootfs, console string, readonly bool) error {
 	if err := system.Chdir(rootfs); err != nil {
 		return fmt.Errorf("chdir into %s %s", rootfs, err)
 	}
-	if err := system.Mount(rootfs, "/", "", syscall.MS_MOVE, ""); err != nil {
-		return fmt.Errorf("mount move %s into / %s", rootfs, err)
+
+	pivotDir, err := ioutil.TempDir(rootfs, ".pivot_root")
+	if err != nil {
+		return fmt.Errorf("can't create pivot_root dir %s", pivotDir, err)
 	}
-	if err := system.Chroot("."); err != nil {
-		return fmt.Errorf("chroot . %s", err)
+	if err := system.Pivotroot(rootfs, pivotDir); err != nil {
+		return fmt.Errorf("pivot_root %s", err)
 	}
 	if err := system.Chdir("/"); err != nil {
 		return fmt.Errorf("chdir / %s", err)
 	}

+	// path to pivot dir now changed, update
+	pivotDir = filepath.Join("/", filepath.Base(pivotDir))
+
+	if err := system.Unmount(pivotDir, syscall.MNT_DETACH); err != nil {
+		return fmt.Errorf("unmount pivot_root dir %s", err)
+	}
+
+	if err := os.Remove(pivotDir); err != nil {
+		return fmt.Errorf("remove pivot_root dir %s", err)
+	}
+
 	system.Umask(0022)

 	return nil
Cgroups in practice
In this sample, we will create a cgroup to restrict the memory usage of a process.
-
ls /sys/fs/cgroup
ubuntu@ubuntu-xenial:~$ ls /sys/fs/cgroup blkio cpuacct cpuset freezer memory net_cls,net_prio perf_event systemd cpu cpu,cpuacct devices hugetlb net_cls net_prio pids -
Create a cgroup
Create a cgroup just simply create a directory.
root@ubuntu-xenial:/sys/fs/cgroup/memory# pwd /sys/fs/cgroup/memory root@ubuntu-xenial:/sys/fs/cgroup/memory# mkdir mem.limit.demo root@ubuntu-xenial:/sys/fs/cgroup/memory# cd mem.limit.demo/ root@ubuntu-xenial:/sys/fs/cgroup/memory/mem.limit.demo# ls cgroup.clone_children memory.kmem.tcp.failcnt memory.oom_control cgroup.event_control memory.kmem.tcp.limit_in_bytes memory.pressure_level cgroup.procs memory.kmem.tcp.max_usage_in_bytes memory.soft_limit_in_bytes memory.failcnt memory.kmem.tcp.usage_in_bytes memory.stat memory.force_empty memory.kmem.usage_in_bytes memory.swappiness memory.kmem.failcnt memory.limit_in_bytes memory.usage_in_bytes memory.kmem.limit_in_bytes memory.max_usage_in_bytes memory.use_hierarchy memory.kmem.max_usage_in_bytes memory.move_charge_at_immigrate notify_on_release memory.kmem.slabinfo memory.numa_stat tasks -
Write a simple sample to "eat" memory
f = open("/dev/urandom", "r") data = "" i=0 while True: data += f.read(1000000) # 1mb i += 1 print "%dmb" % (i*1,) -
Run the sample without applying cgroups limitation
root@ubuntu-xenial:~# python ./eat_memory.py 1mb 2mb 3mb 4mb 5mb 6mb 7mb 8mb 9mb 10mb 11mb 12mb 13mb 14mb 15mb 16mb -
Modify the cgroup value just to write to corresponding files
- memory.limit_in_bytes is used to set the memory size
- memory.swappiness is used to turn on/off swap
-
Enable cgroups and run the eat_memory.py
root@ubuntu-xenial:~# echo "10000000" > /sys/fs/cgroup/memory/mem.limit.demo/memory.limit_in_bytes
root@ubuntu-xenial:~# echo "0" > /sys/fs/cgroup/memory/mem.limit.demo/memory.swappiness
root@ubuntu-xenial:~# echo $$ > /sys/fs/cgroup/memory/mem.limit.demo/tasks
root@ubuntu-xenial:~# echo $$
16877
root@ubuntu-xenial:~# python ./eat_memory.py
1mb
2mb
3mb
4mb
5mb
6mb
Killed
Namespaces in practice
-
diyC which is a very good project for a simple educational linux container runtime in C.
e.g:
git clone https://github.com/w-vi/diyC.git
cd diyC
make
➜ diyC git:(master) ./nsexec --help Create a child process that executes a shell command in new namespace(s), Usage: ./nsexec [OPTIONS] <CMD> -h, --help print this help -n, --net new network namespace -p, --pid new PID namespace -u, --uts HOSTNAME new UTS namespace -v, --verbose more verbose output <CMD> command to be executed➜ diyC git:(master) sudo ./nsexec -n -p -u hello-ns /bin/bash hello-ns diyC # ps -ef UID PID PPID C STIME TTY TIME CMD root 1 0 1 13:46 pts/12 00:00:00 /bin/bash root 23 1 0 13:46 pts/12 00:00:00 ps -ef hello-ns diyC # ip a 1: lo: <LOOPBACK> mtu 65536 qdisc noop state DOWN group default qlen 1 link/loopback 00:00:00:00:00:00 brd 00:00:00:00:00:00 hello-ns diyC # hostname hello-ns hello-ns diyC # -
Run a sample with command line tool
unshareandnsenter- Copy the necessary system bins/libs to the fold of
rootfs, including:
├── bin ├── etc ├── lib ├── lib64 ├── run ├── sbin ├── tmp └── usr- mount proc
mkdir ./rootfs/proc sudo mount -t proc proc $PWD/rootfs/proc- run unshare with -p and -f parameters
ubuntu@ubuntu-xenial:~$ sudo unshare -p -f --mount-proc=/home/ubuntu/rootfs/proc chroot rootfs /bin/bash root@ubuntu-xenial:/# ps aux USER PID %CPU %MEM VSZ RSS TTY STAT START TIME COMMAND root 1 0.0 0.3 19940 3640 ? S 07:40 0:00 /bin/bash root 4 0.0 0.3 36084 3184 ? R+ 07:41 0:00 ps aux root@ubuntu-xenial:/#- Find out pid for the bash command on host (NOT in the chroot-jail)
ps aux | grep /bin/bash | grep root root 17677 0.0 0.3 19944 3652 pts/0 S+ 07:40 0:00 /bin/bash- Show the namespaces info for pid 17677
root@ubuntu-xenial:~# ls -l /proc/17677/ns total 0 lrwxrwxrwx 1 root root 0 Dec 7 07:47 cgroup -> cgroup:[4026531835] lrwxrwxrwx 1 root root 0 Dec 7 07:47 ipc -> ipc:[4026531839] lrwxrwxrwx 1 root root 0 Dec 7 07:47 mnt -> mnt:[4026532129] lrwxrwxrwx 1 root root 0 Dec 7 07:47 net -> net:[4026531957] lrwxrwxrwx 1 root root 0 Dec 7 07:47 pid -> pid:[4026532130] lrwxrwxrwx 1 root root 0 Dec 7 07:47 user -> user:[4026531837] lrwxrwxrwx 1 root root 0 Dec 7 07:47 uts -> uts:[4026531838]- Run nsenter command and launch one more bash
nsenter --pid=/proc/17677/ns/pid unshare -f --mount-proc=$PWD/rootfs/proc chroot rootfs /bin/bash- The two bash command share the same pid namespace and can see each other
root@ubuntu-xenial:/# ps aux USER PID %CPU %MEM VSZ RSS TTY STAT START TIME COMMAND root 1 0.0 0.3 19944 3652 ? S+ 07:40 0:00 /bin/bash root 7 0.0 0.0 5996 688 ? S 07:48 0:00 unshare -f --mount-proc=/home/ubuntu/rootfs/proc chro root 8 0.0 0.3 19940 3816 ? S 07:48 0:00 /bin/bash root 11 0.0 0.3 36084 3292 ? R+ 07:48 0:00 ps aux - Copy the necessary system bins/libs to the fold of
Transparent proxy with iptables
-
iptables + REDIRECT(NAT-based under the hood), e.g:
# Create new chain
iptables -t nat -N SHADOWSOCKS

# Ignore your shadowsocks server's addresses
# It's very IMPORTANT, just be careful.
iptables -t nat -A SHADOWSOCKS -d 123.123.123.123 -j RETURN

# Ignore LANs and any other addresses you'd like to bypass the proxy
# See Wikipedia and RFC5735 for full list of reserved networks.
# See ashi009/bestroutetb for a highly optimized CHN route list.
iptables -t nat -A SHADOWSOCKS -d 0.0.0.0/8 -j RETURN
iptables -t nat -A SHADOWSOCKS -d 10.0.0.0/8 -j RETURN
iptables -t nat -A SHADOWSOCKS -d 127.0.0.0/8 -j RETURN
iptables -t nat -A SHADOWSOCKS -d 169.254.0.0/16 -j RETURN
iptables -t nat -A SHADOWSOCKS -d 172.16.0.0/12 -j RETURN
iptables -t nat -A SHADOWSOCKS -d 192.168.0.0/16 -j RETURN
iptables -t nat -A SHADOWSOCKS -d 224.0.0.0/4 -j RETURN
iptables -t nat -A SHADOWSOCKS -d 240.0.0.0/4 -j RETURN

# Anything else should be redirected to shadowsocks's local port
iptables -t nat -A SHADOWSOCKS -p tcp -j REDIRECT --to-ports 12345

# Apply the rules
iptables -t nat -A PREROUTING -p tcp -j SHADOWSOCKS
In this way, the proxy program can read original IP:Port information via
SO_ORIGINAL_DSTsocket option, e.g:static int getdestaddr(int fd, struct sockaddr_storage *destaddr) { socklen_t socklen = sizeof(*destaddr); int error = 0; error = getsockopt(fd, SOL_IPV6, IP6T_SO_ORIGINAL_DST, destaddr, &socklen); if (error) { // Didn't find a proper way to detect IP version. error = getsockopt(fd, SOL_IP, SO_ORIGINAL_DST, destaddr, &socklen); if (error) { return -1; } } return 0; }Notable, SO_ORIGINAL_DST only apply to TCP and SCTP protocol, for UDP, it does not work. Below is relevant kernel code:
 /* Reversing the socket's dst/src point of view gives us the reply mapping. */
 static int
 getorigdst(struct sock *sk, int optval, void __user *user, int *len)
 {
 	const struct inet_sock *inet = inet_sk(sk);
 	const struct nf_conntrack_tuple_hash *h;
 	struct nf_conntrack_tuple tuple;

 	memset(&tuple, 0, sizeof(tuple));

 	lock_sock(sk);
 	tuple.src.u3.ip = inet->inet_rcv_saddr;
 	tuple.src.u.tcp.port = inet->inet_sport;
 	tuple.dst.u3.ip = inet->inet_daddr;
 	tuple.dst.u.tcp.port = inet->inet_dport;
 	tuple.src.l3num = PF_INET;
 	tuple.dst.protonum = sk->sk_protocol;
 	release_sock(sk);

 	/* We only do TCP and SCTP at the moment: is there a better way? */
 	if (tuple.dst.protonum != IPPROTO_TCP &&
 	    tuple.dst.protonum != IPPROTO_SCTP) {
 		pr_debug("SO_ORIGINAL_DST: Not a TCP/SCTP socket\n");
 		return -ENOPROTOOPT;
 }
So that, for UDP, we need to refer to
TProxyapproach. -
iptable + TPROXY, e.g:
# Create new chain
iptables -t mangle -N SHADOWSOCKS

# Add any UDP rules
ip route add local default dev lo table 100
ip rule add fwmark 1 lookup 100
iptables -t mangle -A SHADOWSOCKS -p udp --dport 53 -j TPROXY --on-port 12345 --tproxy-mark 0x01/0x01

# Apply the rules
iptables -t mangle -A PREROUTING -j SHADOWSOCKS
Set
IP_TRANSPARENTto enable the proxy listenting all of IP packages.setsockopt(server_socket,SOL_IP, IP_TRANSPARENT,&opt,sizeof(opt));and then:
-
For TCP
From here on, the socket returned by accept is automatically bound to the original destination and connected to the source, so using it for transparent proxying requires no more work on this side of the proxy. In order to get the original destination of the socket as a sockaddr_in structure, call getsockname() on the socket returned by accept() as usual.
-
For UDP
To be able to get the original destination, on the UDP socket, set this option before binding:
int enable = 1;
setsockopt(sockfd, SOL_IP, IP_RECVORIGDSTADDR, (const char*)&enable, sizeof(enable));
and then call
recvmsgto receive message, readmsghdrin the message and iteratecmsghdrto obtain the orignal address and port.static int get_dstaddr(struct msghdr *msg, struct sockaddr_storage *dstaddr) { struct cmsghdr *cmsg; for (cmsg = CMSG_FIRSTHDR(msg); cmsg; cmsg = CMSG_NXTHDR(msg, cmsg)) { if (cmsg->cmsg_level == SOL_IP && cmsg->cmsg_type == IP_RECVORIGDSTADDR) { memcpy(dstaddr, CMSG_DATA(cmsg), sizeof(struct sockaddr_in)); dstaddr->ss_family = AF_INET; return 0; } else if (cmsg->cmsg_level == SOL_IPV6 && cmsg->cmsg_type == IPV6_RECVORIGDSTADDR) { memcpy(dstaddr, CMSG_DATA(cmsg), sizeof(struct sockaddr_in6)); dstaddr->ss_family = AF_INET6; return 0; } } return 1; }If you are interested in the transparent proxy implementation, the ss-redir is a good sample for reference, which is using
iptables + REDIRECTas TCP proxy andiptables + TProxyas UDP proxy.
-
This article is Part 2 in a 7-Part Series.
- Part 1 - Build a Modern Scalable System - Basics
- Part 2 - This Article
- Part 3 - Build a Modern Scalable System - Practice on Embedded Router Mode w/ Spring-Cloud
- Part 4 - Build a Modern Scalable System - Practice on Gateway Mode For Mixed-Languages Case
- Part 5 - Build a Modern Scalable System - Practice on Service Mesh Mode with Consul and Nomad
- Part 6 - Build a Modern Scalable System - Practice on Service Mesh Mode with Consul, Nomad and Envoy
- Part 7 - Build a Modern Scalable System - Presentation of Runtime and Data Layers Challenges(in Chinese)