Demystify node.js - Modularization
Published:
by
Zhenghui Lee
![]()
- Categories:
- node.js 2
This article is Part 1 in a 1-Part Series.
- Part 1 - This Article
Table of Contents
- Table of Contents
- Node.js builder
- Components architecture
- Bootstrap workflow
- Module registration and loading
- Wrapping up
Node.js is a popular language on the cloud-native application development. Ryan Dahl who is Node.js creator once mentioned in his interview, the original intention of Node.js comes along with the idea of providing a web server which can combine a simplified web server programming interface with a Nginx-like structured non-blocking I/O basis. With a such premise, Node.js picked up Javascript as programming language and build up a pure async programming interface for I/O operations on the server side, it grows rapidly over the time and created a whole ecosystem by itself.
To be honst, I am not a big fan of javascript, as I personally favour statically typed languages much more on server backend side, but many years ago, when we invested/touched a couple of cloud-native/IoT-relevant projects to look for a more cloud-friendly(native) programming language, I was really attracted by the background idea and implementation in Node.js, it glues two perfect-fit technologies together, provides a powerful, clean, fascinating and fast server side programming interface and runtime.
From our projects, due to some other considerations, we transformed our tech-stack on the backend side from node.js to other languages, but I still kept an eye on Node.js in IoT land. IMHO, IoT was suffering similar challenges and more eager for a Node.js-like technology(we can argue this). Broadly speaking, most of low power IoT devices(in large part of sensors usually are microcontroller based with limited hardward capability: e.g: MCU <= 100MHz, RAM <= 256KB, Flash <= 512KB) are running on I/O-intensive style job(s), embedded programmers still not have an abstraction layer which provide a simplified programming interface across different MCUs and/or RTOS. With the influence of Node.js, some good projects brought up to resolve the problems on IoT platform with alike solution as Node.js, The projects includes Mongoose-OS, NodeMcu and Zephyr.js(btw, Zephyr.js project is based on Zephyr™ Project, which is real-time operating system(RTOS) under Linux Foundation), are intented to build up a basic abstraction layer on IoT platform to speed up the embedded development, in the meanwhile, they supply a similar asynchronous and event-driven programming interface as Node.js does on server backend.
Node.js supports Android and Linux-based system, it definitely can run on a powerful IoT device which is installed an Android or Linux OS, e.g: a "retired" Android smart phone, the smart router with a linux kernel at your home,(of course, if you can hack it :)), Raspberry Pi, etc, but please keep in mind that the suitable hardward to run Node.js/V8 should include FPU as well as at least 128MB RAM, that means a typical OpenWrt hardware or lower powerful MCU based hardware may not be able to run it.

Node.js is not just a javascript runtime, it actually shed much light on the correct fashion to handle I/O via a clean&simpifild async programming interface. In the meanwhile, it is an interesting project for engineering as it is implemented in a highly modularity way(more details will be elaborated in this post on this topic), even nine years old, the code base in Node.js is still relatively small, readable. If you are interested in how Node.js works under the hood, the posts in this series are suitable for you.
Node.js builder
When poking around a software, I personally would like to get a familiar with the builder system, because the builder usually can tell us much more information than compiling a build, indeed, it can help us making a sense of the software dependence boundaries, and also provides a highlevel outlook of souce code structure. So let's begin the journey with node.js builder.
Waf
waf is the 1st-gen build toolkit used by node.js for the versions prior to v0.8. If you see a project, especially an C/C++ addon, contains a file named "wscript", that usually means it came along with a very old Node.js version. Consiering I am trying to complete the article with latest LTS version(by now, it is v10.13.0), I will skip the introduction on Waf in this post.
GYP
GYP is the build tool used by node.js and node-gyp since v0.8.
From wikipedia:
GYP(generate your projects) is a build automation tool. GYP was created by Google to generate native IDE project files (such as Visual Studio Code and Xcode) for building the Chromium web browser and is licensed as open source software using the BSD software license.
The functionality of GYP is similar to the CMake build tool. GYP processes a file that contains a JSON dictionary in order to generate one or more target project make files. The single source .GYP file is generic while the target files are specific to each targeted build tool.
Software projects being built using GYP include the V8 Javascript engine, Google's Chromium web browser, Dart, Node.js, WebRTC, and Telegram.
BTW,GN is a meta-build system that generates NinjaBuild files, GN files are more readable and maintainable than GYP files, in the meanwhile, it is fast, the test result from Google mentioned it is 20x faster than GYP. In 2016 the Chromium project replaced GYP with GN. The project deno(Ryan's new project for a secure typescript runtime on V8) is using GN as it build system.
If you want to get quick started on GYP, please refer to my hello-gyp sample. If your project include Executable ELF, and dependences with Static library and/or Dynamic linking library, you can refer to my example for a quick reference.
Node.js build process
Below diagram show the Node.js building process. Briefly, it includes four phases: configure, gyp, code-gen, make. Just like a normal C/C++ project, we can run configure to set compile options, the Gyp description eventually will be translated to make files, and finally the Node.js can be compiled by make command. Please pay attention to the source code auto-gen by js2c.py command, as the "NativeModule" registration&loading heavily depends on it during runtime.

link for a clearer picture.
Enable calltracer to Node.js
Let's take a closer look at Node.js builder via a quick practice on enabling calltracer for Node.js, which can collect the execution stack and generate a flame to help us explore the detailed node.js workflow. All of source code or samples mentioned by this post are based on node.js v10.13.0(the latest version of node.js when I writing this post).
If you read my ealier post, you may know about calltracer. calltracer is a toolkit I developed to track/visualize C/C++ program execution stack. To troubleshoot/learn a C/C++ program, sometimes, we need involve a step-by-step debugging to walk through the execution stack, but that somewhat inefficient, using calltracer, we can run the test-case/sample once, calltracer can generate a full execution stack calltracer log, later, you can retrieve the pieces of execution logic you are interested, generate the flame and zoom-in the flame to get the detailed invocation information there, do not need to worry about missing something and rerun the test case to get that back. It supports both
GYPandWafbased projects.
- Prerequisites
- Run the practice on Linux OS
- Assume git, gcc, g++, make are installed properly on your system. (I am using "gcc- 5.5.0" on my Ubuntu workstation to compile/run these samples).
-
Add git submodule for calltracer, following Node.js source structure, pull the calltracer to
<node_src>/depsgit clone https://github.com/nodejs/node cd ./node git checkout -b v10.13.0 v10.13.0 git submodule add https://github.com/leezhenghui/calltracer.git deps/calltracer -
Add a new compile option to turn on/off calltracer
configure.py+parser.add_option('--calltracer', + action='store_true', + dest='node_calltracer', + help='build with CallTracer(only available on linux)') + -
Define a relevant gyp variables
configure.py+ if flavor == 'linux' and options.node_calltracer and options.debug: + o['variables']['node_use_calltracer'] = 'true' + else: + o['variables']['node_use_calltracer'] = 'false' + -
Add Gyp description for calltracer and enable it by condition.
node.gypi+ [ 'node_use_calltracer=="true"', { + 'dependencies': [ 'deps/calltracer/build.gyp:calltracer' ], + "cflags": [ "-finstrument-functions", '-g', '-O0', '-fno-omit-frame-pointer' ], + }], -
Build node.js and turn on calltracer
./configure --debug --calltracer make -
Verify the compiled result
ldd your elf, if you see output on the console like this, your Node.js is compiled with calltracer successfully.
out/Release/node:
  linux-vdso.so.1 =>  (0x00007fffcabf4000)
  libcalltracer.so => <your_node>/out/Release/lib.target/libcalltracer.so (0x00007f098718c000)
  libdl.so.2 => /lib/x86_64-linux-gnu/libdl.so.2 (0x00007f0986f5f000)
  librt.so.1 => /lib/x86_64-linux-gnu/librt.so.1 (0x00007f0986d57000)
  libstdc++.so.6 => /usr/lib/x86_64-linux-gnu/libstdc++.so.6 (0x00007f0986a40000)
  libm.so.6 => /lib/x86_64-linux-gnu/libm.so.6 (0x00007f098673a000)
  libgcc_s.so.1 => /lib/x86_64-linux-gnu/libgcc_s.so.1 (0x00007f0986522000)
  libpthread.so.0 => /lib/x86_64-linux-gnu/libpthread.so.0 (0x00007f0986303000)
  libc.so.6 => /lib/x86_64-linux-gnu/libc.so.6 (0x00007f0985f3a000)
  /lib64/ld-linux-x86-64.so.2 (0x0000557918979000)
Components architecture
Making a framework extensible is challenging but rewarding, especially for a language runtime, the extensibility is a key feature to build and grow the ecosystem.
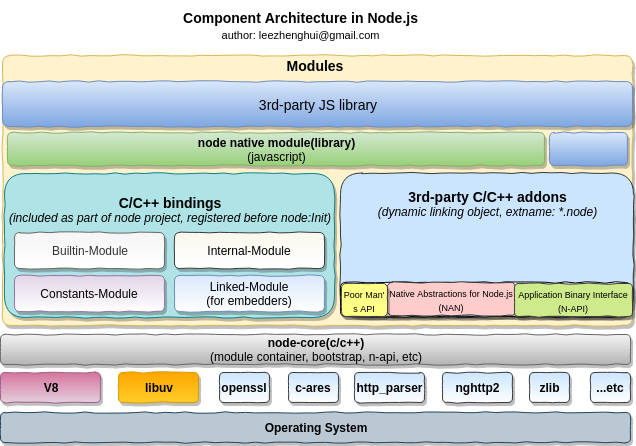
As you can see, the node.js architecture is based on a modular design. It includes a micro-core(let's name it node-core in this article) which provide a highly extensible capabilities, most of features are encapsulated as a kind of module(C/C++ binding, C/C++ addon or JS library) contributed to Node.js project/ecosystem, that make Node.js easy to be extended and build up it's own ecosystem.
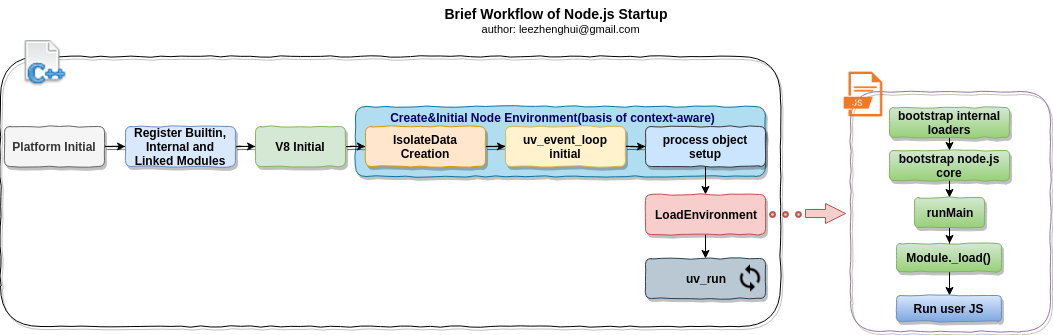
Bootstrap workflow
Essentially, node.js is working as a glues to put V8, libuv and other things together. To understand how node-core works, the bootstrap workflow is a very important phase. Let's take a closer look at what it actually does in node-core in bootstrap phase.
Environment is an isolation concept from Node perspective. It was introduced by the feature of "multi-context" enablement in Node.js v0.12. The background story for "multi-context" requirement sounds like coming from Node embedders, who want to enable Node to have the capability of multiple instances of Node co-exist peacefully within the same process. As the result, Node need to ensure the handle and wrap object "remember" the context they belong to and switch back to the proper context when the time comes to C++ runtime call into JS land(V8 VM). The Environment class is intented to encapsulates everything (or almost everything) that belongs to the context for a complete isolation in Node perspective. Understanding this is important for Node.js contributor or embedders, you need to know about whether the module is a *_CONTEXT_AWARE module or not, and select a correct way to implement the module, including turn your global variables into per-context property in your module if it is a context-aware module.
BTW, The commit-756b622 as the first delviery in this area, which enable Node v0.12 to use multiple V8 execution contexts within a single event loop.
Below is a sequencing diagram which cover more detailed information about the Node.js bootstrap workflow:
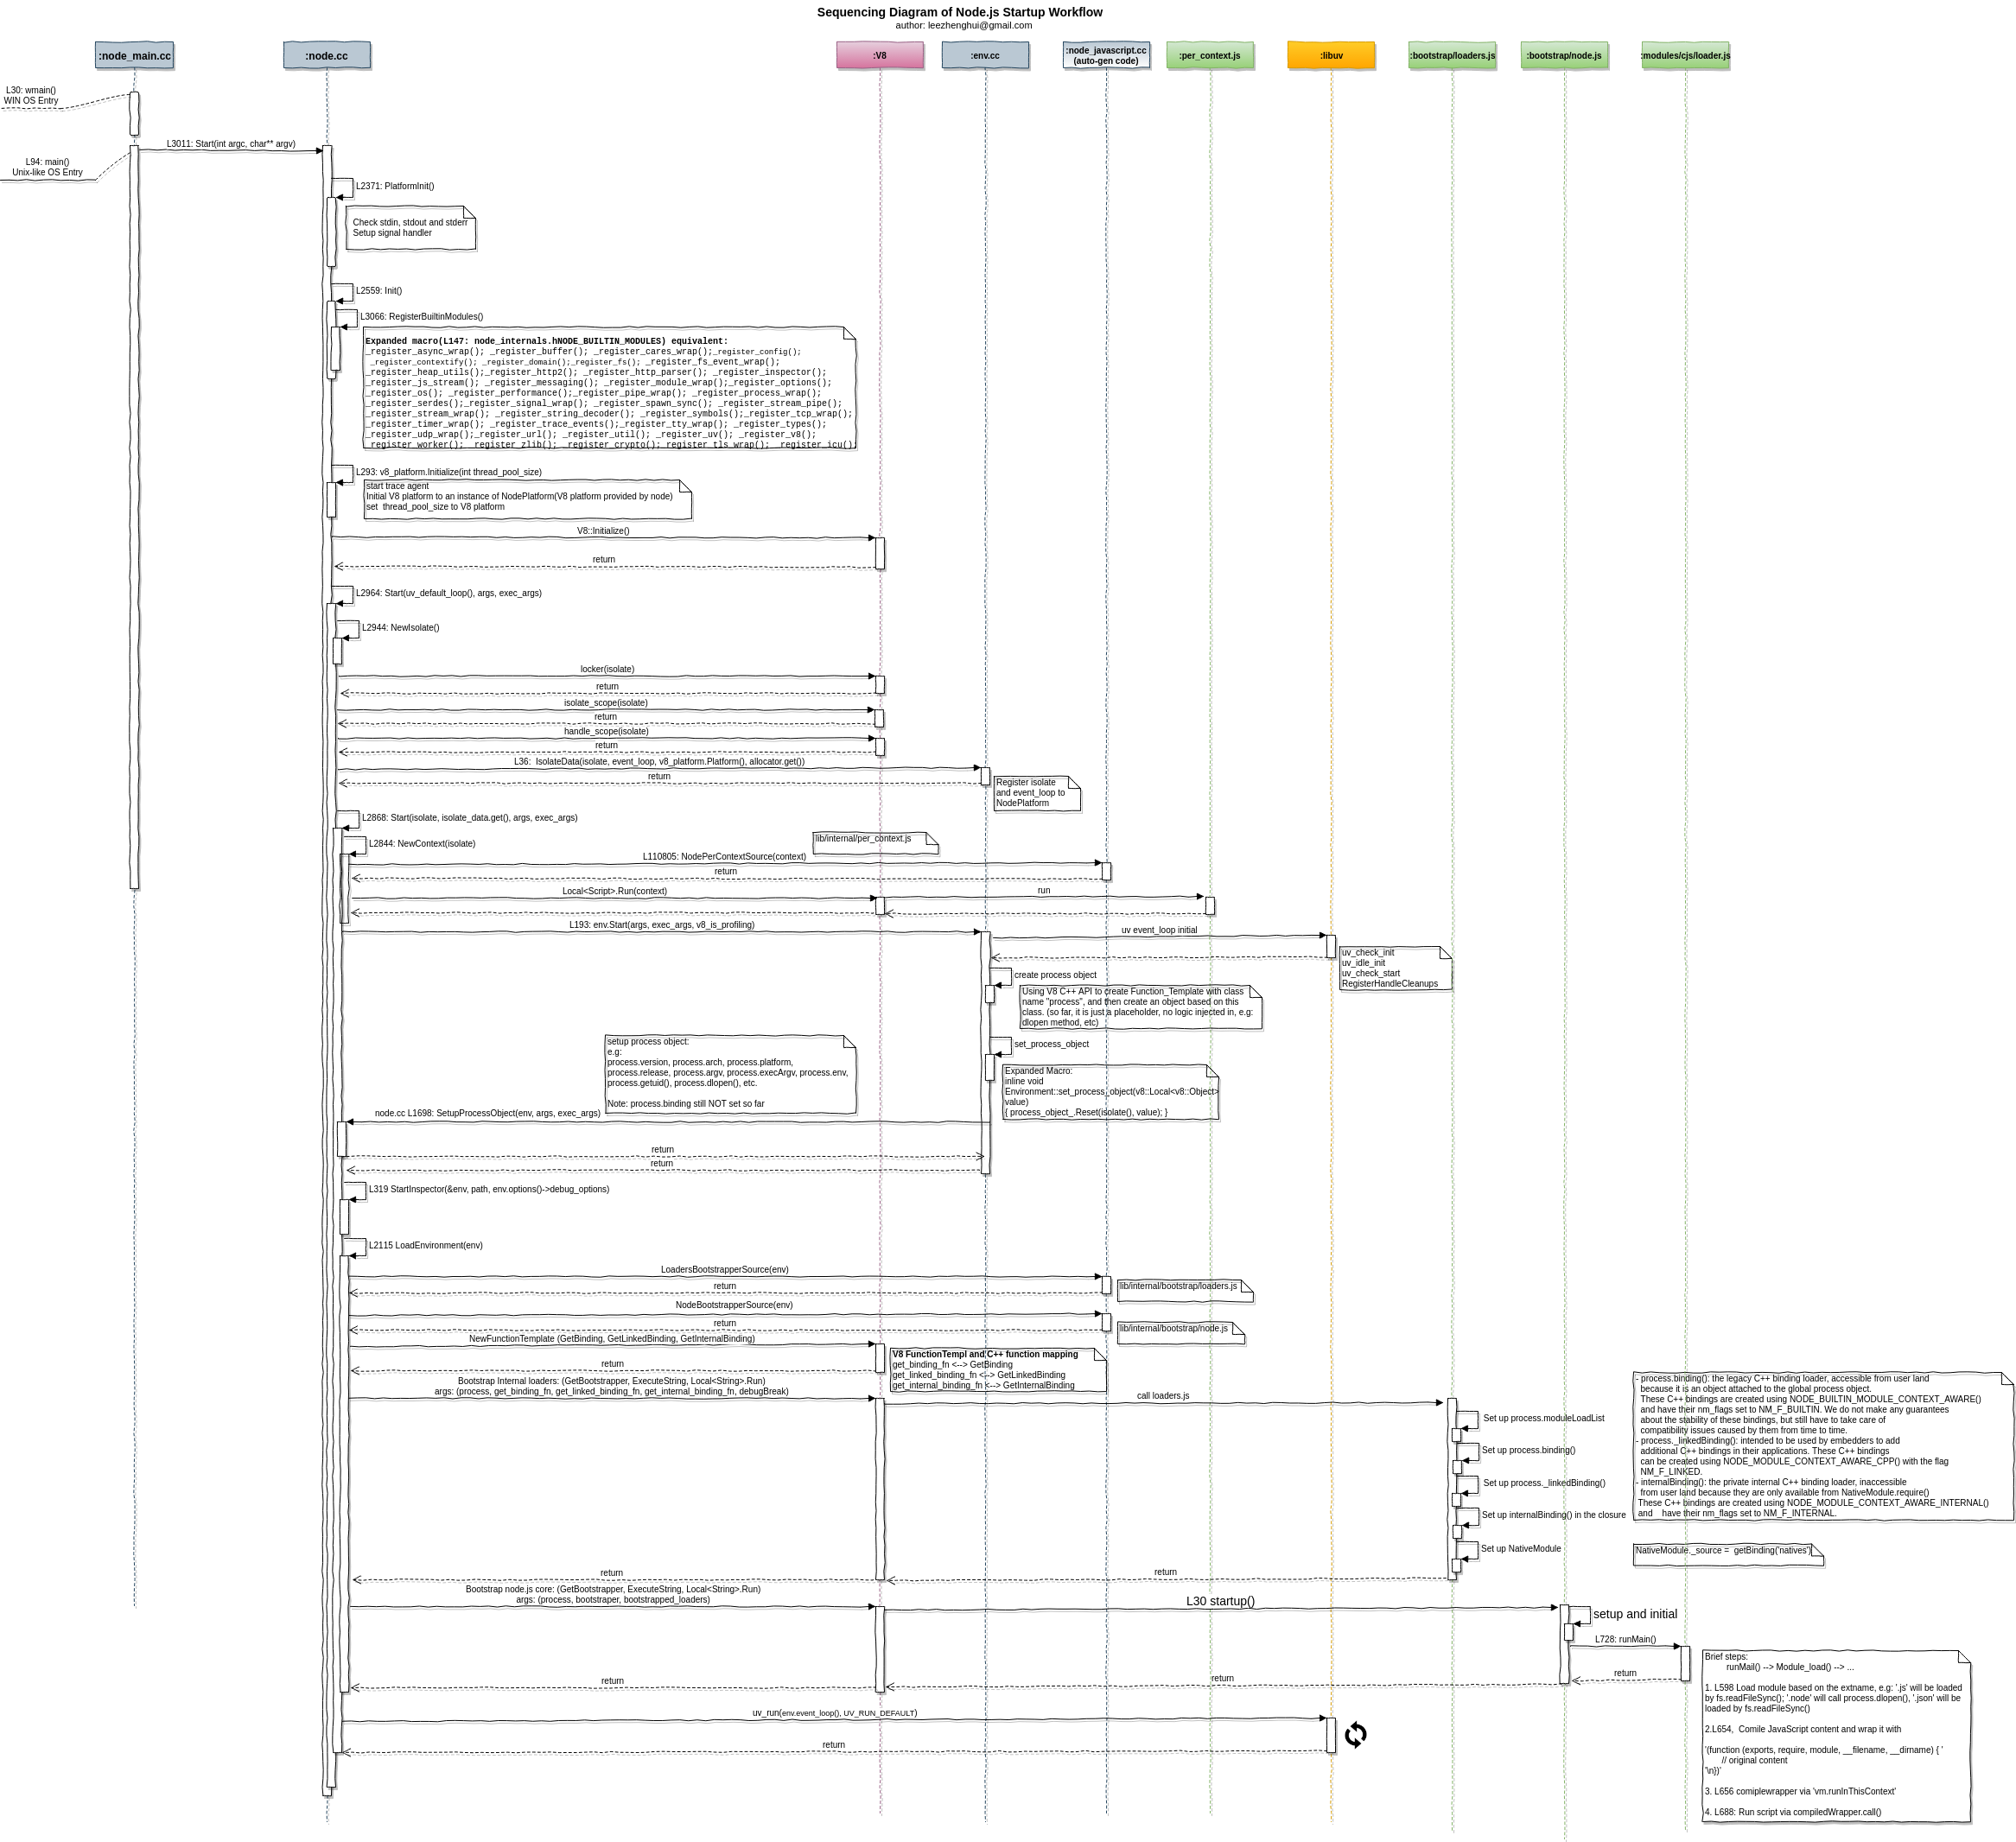
Refer to link(size: ~1M) for a clearer picture.
Module registration and loading
As component architecture diagram show us, mainly, we have seven types of modules in Node.js, including: Builtin Module, Internal Module, Linked Module, Constants Module, 3rd-party C/C++ addon, Native Module and CJS/ES Module. All of these modules consist of the whole Node.js runtime and ecosystem. It is following a highly modularized design. Let's walk through these modules one-by-one for understanding how these modules get registered and loaded in Node.js runtime.

Builtin module
The modules use NM_F_BUILTIN (this is based on the latest code in master branch)
NODE_BUILTIN_MODULE_CONTEXT_AWARE(inspector, node::inspector::Initialize);
NODE_BUILTIN_MODULE_CONTEXT_AWARE(util, node::util::Initialize)
NODE_BUILTIN_MODULE_CONTEXT_AWARE(tcp_wrap, node::TCPWrap::Initialize)
NODE_BUILTIN_MODULE_CONTEXT_AWARE(url, node::url::Initialize)
NODE_BUILTIN_MODULE_CONTEXT_AWARE(udp_wrap, node::UDPWrap::Initialize)
NODE_BUILTIN_MODULE_CONTEXT_AWARE(inspector, Initialize)
NODE_BUILTIN_MODULE_CONTEXT_AWARE(process_wrap, node::ProcessWrap::Initialize)
NODE_BUILTIN_MODULE_CONTEXT_AWARE(buffer, node::Buffer::Initialize)
NODE_BUILTIN_MODULE_CONTEXT_AWARE(contextify, node::contextify::Initialize)
NODE_BUILTIN_MODULE_CONTEXT_AWARE(os, node::os::Initialize)
NODE_BUILTIN_MODULE_CONTEXT_AWARE(async_wrap, node::AsyncWrap::Initialize)
NODE_BUILTIN_MODULE_CONTEXT_AWARE(fs_event_wrap, node::FSEventWrap::Initialize)
NODE_BUILTIN_MODULE_CONTEXT_AWARE(spawn_sync, node::SyncProcessRunner::Initialize)
NODE_BUILTIN_MODULE_CONTEXT_AWARE(js_stream, node::JSStream::Initialize)
NODE_BUILTIN_MODULE_CONTEXT_AWARE(pipe_wrap, node::PipeWrap::Initialize)
NODE_BUILTIN_MODULE_CONTEXT_AWARE(tty_wrap, node::TTYWrap::Initialize)
NODE_BUILTIN_MODULE_CONTEXT_AWARE(crypto, node::crypto::Initialize)
NODE_BUILTIN_MODULE_CONTEXT_AWARE(tls_wrap, node::TLSWrap::Initialize)
NODE_BUILTIN_MODULE_CONTEXT_AWARE(config, node::Initialize)
NODE_BUILTIN_MODULE_CONTEXT_AWARE(zlib, node::Initialize)
NODE_BUILTIN_MODULE_CONTEXT_AWARE(fs, node::fs::Initialize)
NODE_BUILTIN_MODULE_CONTEXT_AWARE(icu, node::i18n::Initialize)
NODE_BUILTIN_MODULE_CONTEXT_AWARE(cares_wrap, node::cares_wrap::Initialize)
Register
-
Macro
NODE_BUILTIN_MODULE_CONTEXT_AWAREis used to declare a builtin moduleFor example,
node\_os.cc473 NODE_BUILTIN_MODULE_CONTEXT_AWARE(os, node::os::Initialize) -
Expanded macros equivalence:
static node::node_module _module = { 64, NM_F_BUILTIN, nullptr, "../src/node_os.cc", nullptr, (node::addon_context_register_func) (node::os::Initialize), "os", nullptr, nullptr }; void _register_os() { node_module_register(&_module); } -
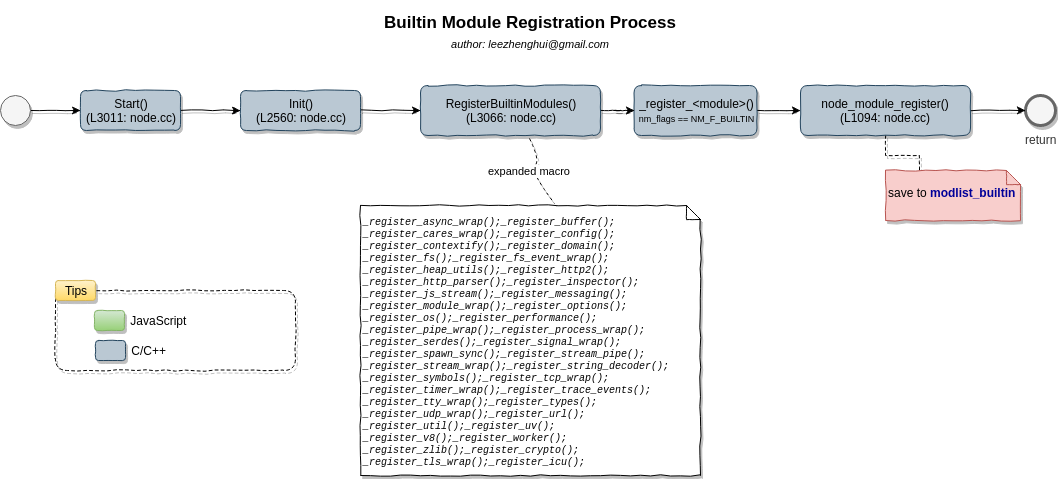
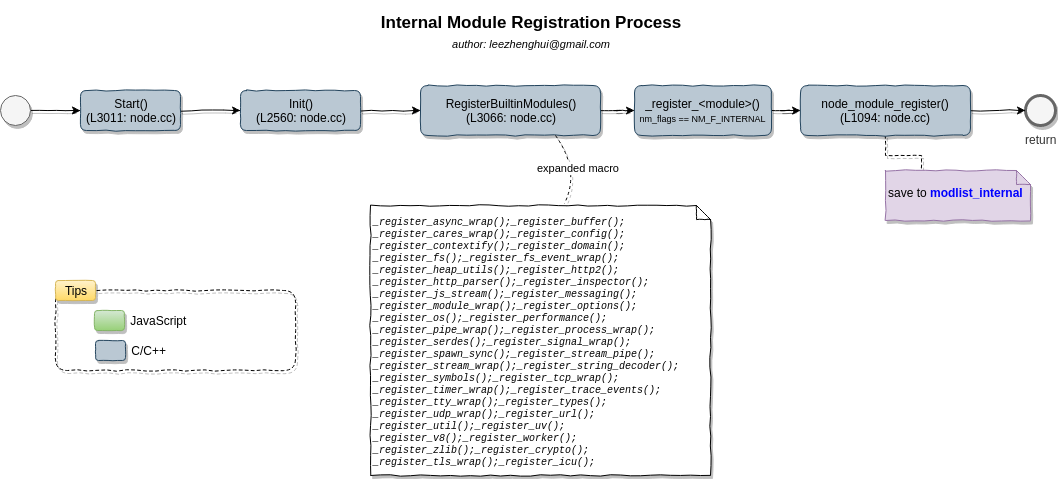
Registration
Builtin modules is done explicitly by node-core during Node.js bootstrap phase, some relevant logic sources is as below:
-
src/node.cc116 // This is used to load built-in modules. Instead of using 117 // __attribute__((constructor)), we call the _register_<modname> 118 // function for each built-in modules explicitly in 119 // node::RegisterBuiltinModules(). This is only forward declaration. 120 // The definitions are in each module's implementation when calling 121 // the NODE_BUILTIN_MODULE_CONTEXT_AWARE. 122 #define V(modname) void _register_##modname(); 123 NODE_BUILTIN_MODULES(V) 124 #undef V ... 3064 // Call built-in modules' _register_<module name> function to 3065 // do module registration explicitly. 3066 void RegisterBuiltinModules() { 3067 #define V(modname) _register_##modname(); 3068 NODE_BUILTIN_MODULES(V) 3069 #undef V 3070 } -
src/node_internal.h100 // A list of built-in modules. In order to do module registration 101 // in node::Init(), need to add built-in modules in the following list. 102 // Then in node::RegisterBuiltinModules(), it calls modules' registration 103 // function. This helps the built-in modules are loaded properly when 104 // node is built as static library. No need to depend on the 105 // __attribute__((constructor)) like mechanism in GCC. 106 #define NODE_BUILTIN_STANDARD_MODULES(V) \ 107 V(async_wrap) \ 108 V(buffer) \ 109 V(cares_wrap) \ 110 V(config) \ 111 V(contextify) \ 112 V(domain) \ 113 V(fs) \ 114 V(fs_event_wrap) \ 115 V(heap_utils) \ 116 V(http2) \ 117 V(http_parser) \ 118 V(inspector) \ 119 V(js_stream) \ 120 V(messaging) \ 121 V(module_wrap) \ 122 V(options) \ 123 V(os) \ 124 V(performance) \ 125 V(pipe_wrap) \ 126 V(process_wrap) \ 127 V(serdes) \ 128 V(signal_wrap) \ 129 V(spawn_sync) \ 130 V(stream_pipe) \ 131 V(stream_wrap) \ 132 V(string_decoder) \ 133 V(symbols) \ 134 V(tcp_wrap) \ 135 V(timer_wrap) \ 136 V(trace_events) \ 137 V(tty_wrap) \ 138 V(types) \ 139 V(udp_wrap) \ 140 V(url) \ 141 V(util) \ 142 V(uv) \ 143 V(v8) \ 144 V(worker) \ 145 V(zlib) 146 147 #define NODE_BUILTIN_MODULES(V) \ 148 NODE_BUILTIN_STANDARD_MODULES(V) \ 149 NODE_BUILTIN_OPENSSL_MODULES(V) \ 150 NODE_BUILTIN_ICU_MODULES(V) -
Expanded above macros to below equivalence:
...

# 123 "../src/node.cc"
 void _register_async_wrap(); void _register_buffer(); void _register_cares_wrap(); void _register_config(); void _register_contextify(); void _register_domain(); void _register_fs(); void _register_fs_event_wrap(); void _register_heap_utils(); void _register_http2(); void _register_http_parser(); void _register_inspector(); void _register_js_stream(); void _register_messaging(); void _register_module_wrap(); void _register_options(); void _register_os(); void _register_performance(); void _register_pipe_wrap(); void _register_process_wrap(); void _register_serdes(); void _register_signal_wrap(); void _register_spawn_sync(); void _register_stream_pipe(); void _register_stream_wrap(); void _register_string_decoder(); void _register_symbols(); void _register_tcp_wrap(); void _register_timer_wrap(); void _register_trace_events(); void _register_tty_wrap(); void _register_types(); void _register_udp_wrap(); void _register_url(); void _register_util(); void _register_uv(); void _register_v8(); void _register_worker(); void _register_zlib(); void _register_crypto(); void _register_tls_wrap(); void _register_icu();
 ...

void RegisterBuiltinModules() {
  _register_async_wrap(); _register_buffer(); _register_cares_wrap(); _register_config(); _register_contextify(); _register_domain(); _register_fs(); _register_fs_event_wrap(); _register_heap_utils(); _register_http2(); _register_http_parser(); _register_inspector(); _register_js_stream(); _register_messaging(); _register_module_wrap(); _register_options(); _register_os(); _register_performance(); _register_pipe_wrap(); _register_process_wrap(); _register_serdes(); _register_signal_wrap(); _register_spawn_sync(); _register_stream_pipe(); _register_stream_wrap(); _register_string_decoder(); _register_symbols(); _register_tcp_wrap(); _register_timer_wrap(); _register_trace_events(); _register_tty_wrap(); _register_types(); _register_udp_wrap(); _register_url(); _register_util(); _register_uv(); _register_v8(); _register_worker(); _register_zlib(); _register_crypto(); _register_tls_wrap(); _register_icu();
}
-
-
Roughly steps for builtin modules regisration

If you are familar with ealier node.js version code, you might know that the builtin module was registered by the way of
GCC constructor attribute, the constructor attribute causes the function to be called automatically before main(). it is refined to a explicitly registration way now. -
We can use calltracer to generate an execution stack flame for the particular part of logic we are interested in. .e.g: we want to capture
osbuiltin module registration execution stack-
Run the sample with calltracer
CALLTRACER_ENABLE=1 <node_src>/out/Release/node -
Generate trace for flamegraph
node --max-old-space-size=8192 ./tools/iseq/iseq -s 0 -v flamegraph -o ./out > ./out/iseq.log 2>&1 -
Execution stack flame

Refer to link for a clearer picture
-
Loading process
The builtin module can be accessed from user land via process_binding() method in JS code.
Below is the brief steps for loading a builtin module process
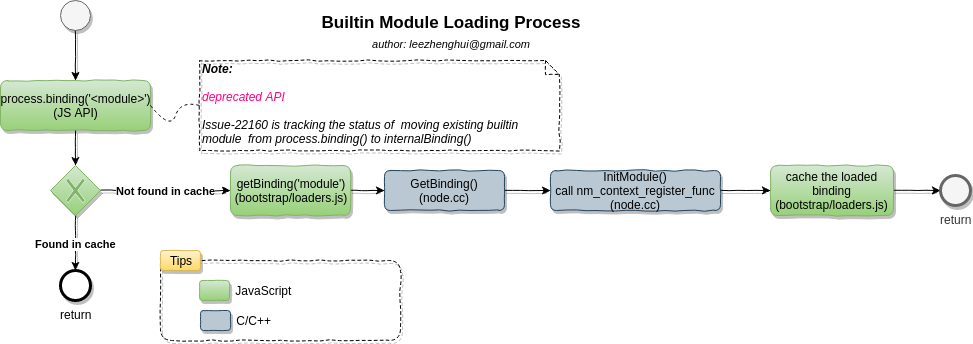
By the time being, Node.js team is working on a WIP task to move from process.binding() to internalBinding(), Please refer to issue-22160 for the latest status about this change.
Internal module
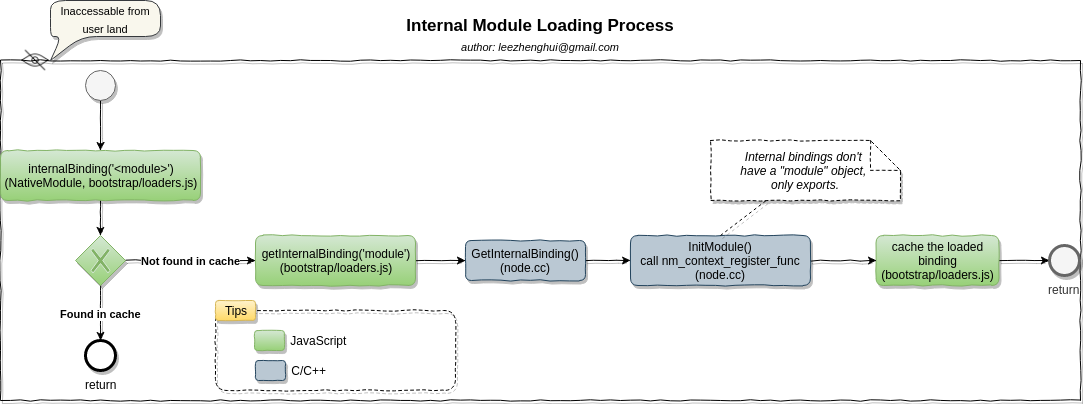
The internal module type was introduced by in v8.9.0, the purpose is to transfer most of builtin modules to internal module, so we can avoid exposing these module to end user and make the end user code more loose-coupled with these Node.js internal C/C++ implementation.
The modules use NM_F_INTERNAL (this is based on the latest code in master branch)
NODE_MODULE_CONTEXT_AWARE_INTERNAL(heap_utils, node::heap::Initialize)
NODE_MODULE_CONTEXT_AWARE_INTERNAL(types, node::InitializeTypes)
NODE_MODULE_CONTEXT_AWARE_INTERNAL(timers, node::Initialize)
NODE_MODULE_CONTEXT_AWARE_INTERNAL(http2, node::http2::Initialize)
NODE_MODULE_CONTEXT_AWARE_INTERNAL(string_decoder, node::InitializeStringDecoder)
NODE_MODULE_CONTEXT_AWARE_INTERNAL(http_parser, node::Initialize)
NODE_MODULE_CONTEXT_AWARE_INTERNAL(performance, node::performance::Initialize)
NODE_MODULE_CONTEXT_AWARE_INTERNAL(uv, node::Initialize)
NODE_MODULE_CONTEXT_AWARE_INTERNAL(messaging, node::worker::InitMessaging)
NODE_MODULE_CONTEXT_AWARE_INTERNAL(trace_events, node::Initialize)
NODE_MODULE_CONTEXT_AWARE_INTERNAL(serdes, node::Initialize)
NODE_MODULE_CONTEXT_AWARE_INTERNAL(v8, node::Initialize)
NODE_MODULE_CONTEXT_AWARE_INTERNAL(stream_pipe, node::InitializeStreamPipe)
NODE_MODULE_CONTEXT_AWARE_INTERNAL(domain, node::domain::Initialize)
NODE_MODULE_CONTEXT_AWARE_INTERNAL(module_wrap, node::loader::ModuleWrap::Initialize)
NODE_MODULE_CONTEXT_AWARE_INTERNAL(worker, node::worker::InitWorker)
NODE_MODULE_CONTEXT_AWARE_INTERNAL(symbols, node::symbols::Initialize)
NODE_MODULE_CONTEXT_AWARE_INTERNAL(signal_wrap, node::SignalWrap::Initialize)
NODE_MODULE_CONTEXT_AWARE_INTERNAL(stream_wrap, node::LibuvStreamWrap::Initialize)
Register
Loading process
Internal module can NOT be accessed in user land.
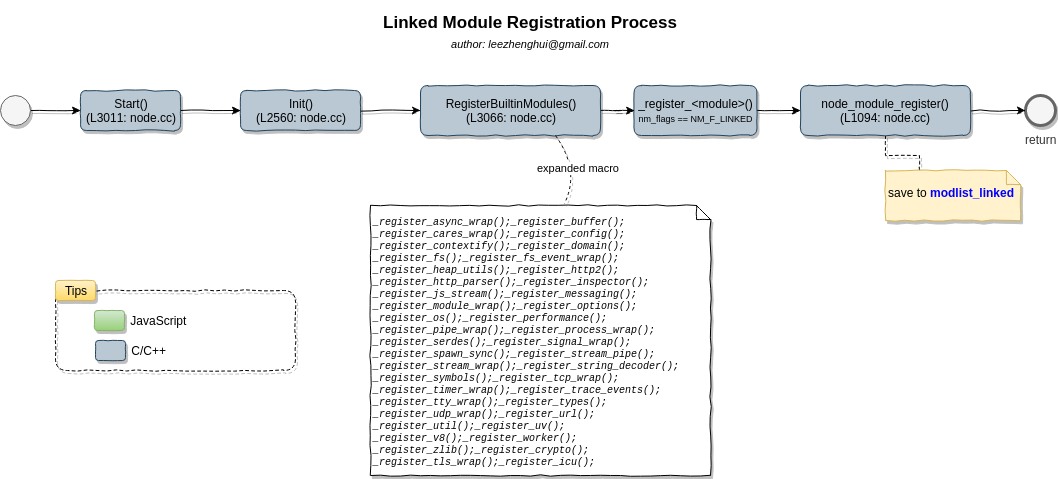
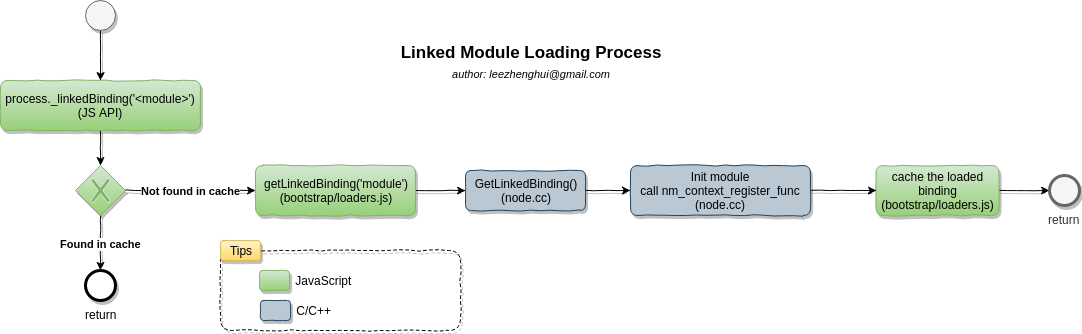
Linked module
Linked module use module flag NM_F_LINKED, it is intented to be used by node.js embedders who want to add addtional C/C++ bindings to their application.
Register
Loading process
Linked module can be accessed via process.\_linkedBinding() in JS land.
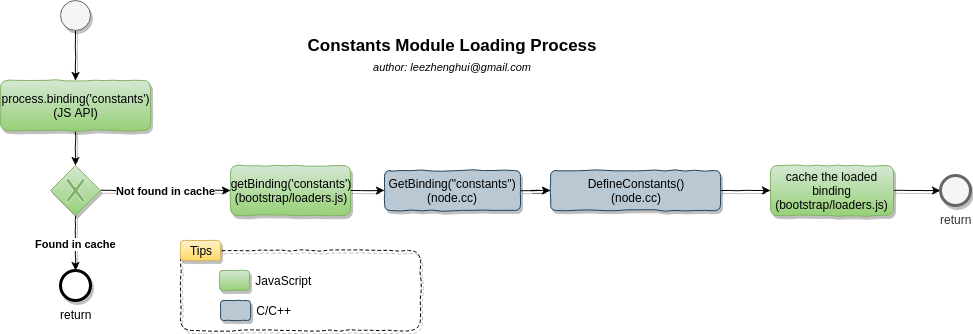
Constants module
Constants module is a specicial module which provide some common constants definition and exposed to JS land via process.binding('constants').
Loading process
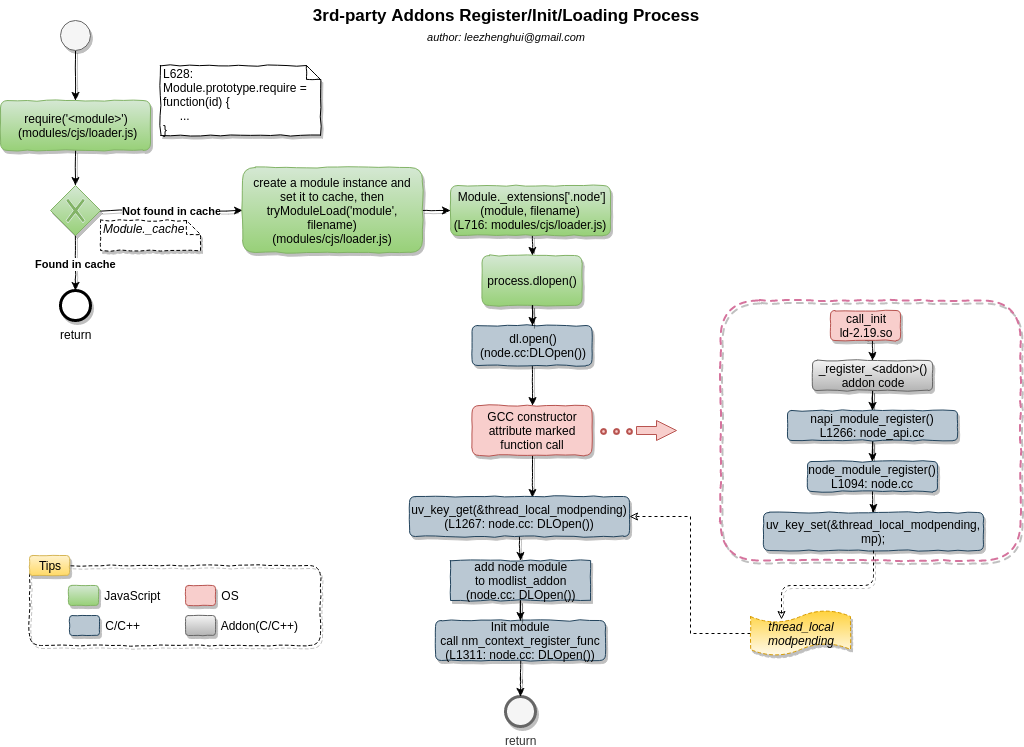
3rd-party addons
The 3rd-parity C/C++ addon is the approach that allow end user to contribute their feature to exntend Node.js ecosystem via C/C++ binding. It mainly experienced three phases.
- Poor man solution phase
At the beginning of Node.js, the 3rd-party addon is allowed to access the google V8 API and Node.js API directly, this kind of addon is very frangible, when Node.js upgrade V8 version or changes in Node.js API.
- NAN
Later, Node.js team(Rod Vagg and Benjamin Byholm) contributed NAN(stands for Native Abstraction for Node.js) to resolve this problem. NAN actually are many macros which can hide the version differences and intelligently expand the appropriate logic branch based on the expected Node.js version. Of course, it need a recompilation for the addon if Node.js version change. This is the main approach used by legacy C/C++ addons currently.
- NAP
From Node.js API doc:
N-API (pronounced N as in the letter, followed by API) is an API for building native Addons. It is independent from the underlying JavaScript runtime (ex V8) and is maintained as part of Node.js itself. This API will be Application Binary Interface (ABI) stable across versions of Node.js. It is intended to insulate Addons from changes in the underlying JavaScript engine and allow modules compiled for one major version to run on later major versions of Node.js without recompilation.
Write a 3rd-party addon
Let's start with the Node.js helloworld addon sample which use N-API approach.
-
hello.cc#include <node_api.h> #include <assert.h> napi_value Method(napi_env env, napi_callback_info info) { napi_status status; napi_value world; status = napi_create_string_utf8(env, "world", 5, &world); assert(status == napi_ok); return world; } #define DECLARE_NAPI_METHOD(name, func) \ { name, 0, func, 0, 0, 0, napi_default, 0 } napi_value Init(napi_env env, napi_value exports) { napi_status status; napi_property_descriptor desc = DECLARE_NAPI_METHOD("hello", Method); status = napi_define_properties(env, exports, 1, &desc); assert(status == napi_ok); return exports; } NAPI_MODULE(NODE_GYP_MODULE_NAME, Init) -
hello.jsvar addon = require('bindings')('hello'); console.log(addon.hello()); // 'world' -
Expanded macro
NAPI_MODULE(NODE_GYP_MODULE_NAME, Init)equivalenceextern "C" { static napi_module _module = { 1, 0, "../hello.cc", Init, "hello", # 23 "../hello.cc" 3 4 __null # 23 "../hello.cc" , {0}, }; static void _register_hello(void) __attribute__((constructor)); static void _register_hello(void) { napi_module_register(&_module); } }
Node.js reply on
libuvfor his event loop, there are two kinds of approaches to gain an async manner in the event loop(reactor pattern):[1] For the real non-blocking I/O, e.g: socket, pipe, a multiplex techonology will be selected.
[2] For the I/O which can't play with a real non-blocking mode, e.g: regular file, DNS ops, it will use multi-thread to simulate the async manner, and libuv will adopt it to the event loop internally for you.
The 3rd-party addon use approach[2] for the async behavior and Node.js runtime can adopt it event loop transparently.
Brief workflow for registration and loading
calltracer execution stack
-
Enable calltracer on the sample to capture more detailed execution stack:
binding.gyp{ "targets": [ { "target_name": "hello", "sources": [ "hello.cc" ], "cflags": [ "-finstrument-functions", '-g', '-O0', '-fno-omit-frame-pointer' ], } ] } -
Run the sample with calltracer
CALLTRACER_ENABLE=1 <node_src>/out/Release/node ./hello.jsnode --max-old-space-size=8192 <calltracer_src>/tools/iseq/iseq -s 0 -v flamegraph -o ./out > ./out/iseq.log 2>&1 -
Generate execution stack flame for the interested parts

Refer to link for a clearer picture
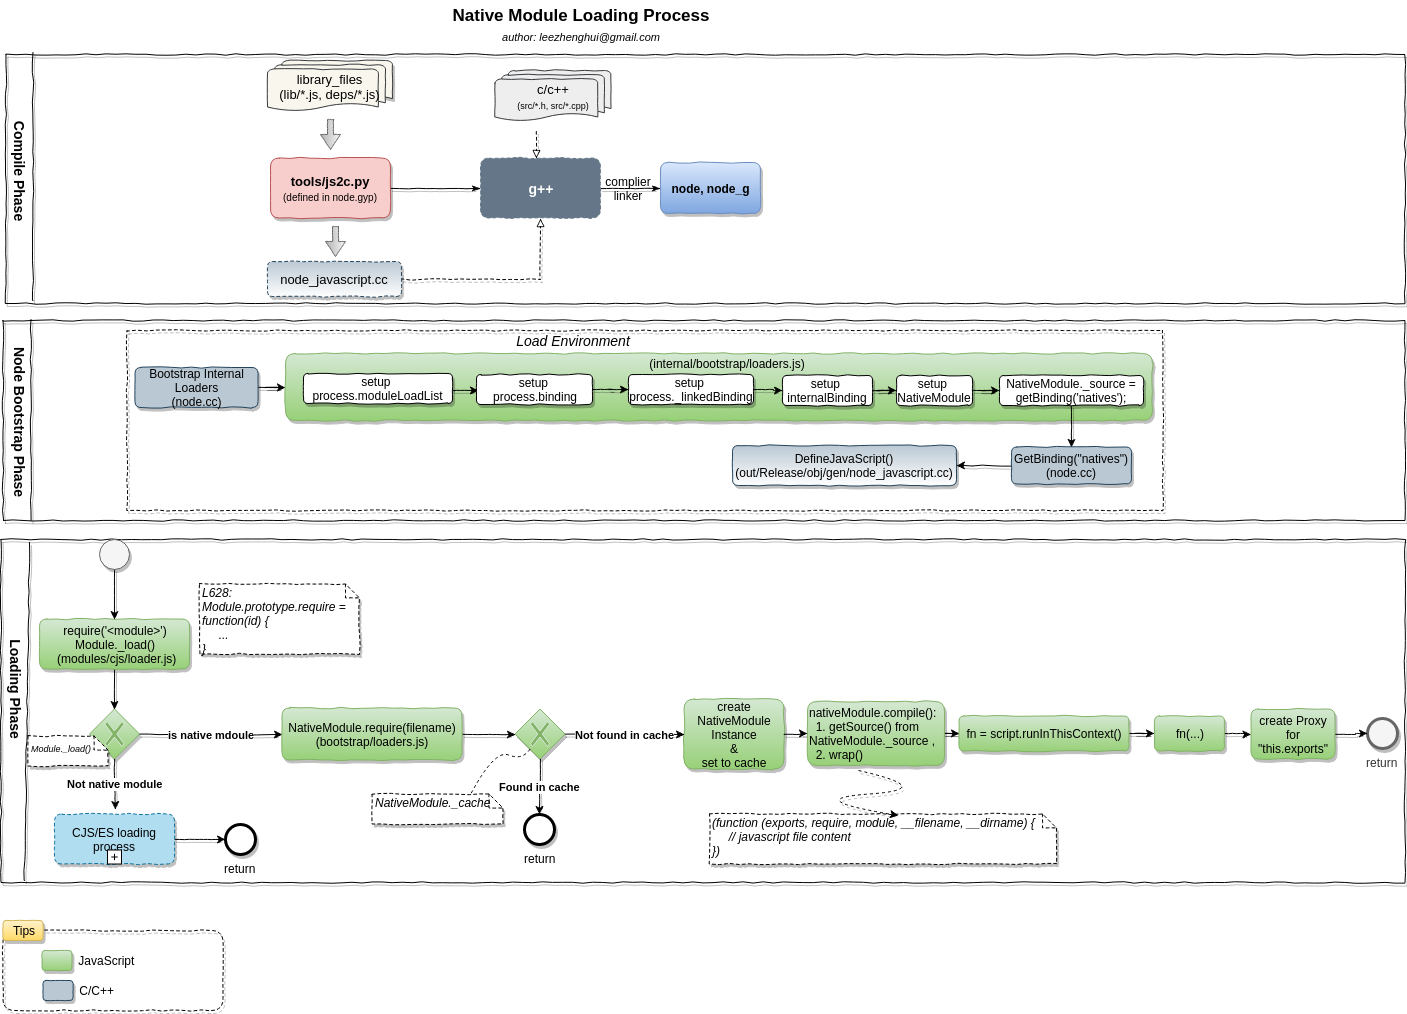
Native module
Native mdoule are the JS library provided by Node.js runtime, they are the most important programming interface exposed to end user by Node.js. To provide a better performance/security on these JS library registration and loading, Node.js need to conjunct three phases efforts to make it happen.
-
Compile phase: Dynamically generate C++ code to contain these JS library, and get them compile into the ELF file.
-
Bootstrap phase: Pass and encapsulate these JS source to
NativeModule._source -
Loading phase: cache enabled.
Registration and Loading process
The module can be accessed in user land via require(<module>)
CJS Module(3rd-party JS library)
This is the JS code from end user, e.g: express.js, node-red
Loading process
The module can be accessed in user land via require(<module>)

Wrapping up
In this post, we covered below parts in Node.js:
-
Introduce Node.js build toolkit via enable calltracer on Node.js code.
-
Node-core, what it does during the bootstrap phase.
-
Introduce the module types which composite the Node.js runtime and ecosystem.
-
Walk through each module type and elaborate the workflow for the module registration and loading.
I hope this post can help you setup a overview components structure in Node.js, especially, reduce your time to isolate a problem in Node.js, or contribute a feature to Node.js.
Anyway, this is just a beginning of the journey to exploring the Node.js internals. Many interesting things are waiting for us to discover in the future posts. :-)
This article is Part 1 in a 1-Part Series.
- Part 1 - This Article